Crawl Space Mold: $1,500–$5,000 to Fix (2026 Guide)
Crawl space mold remediation costs $1,500–$5,000. Full encapsulation $5,000–$15,000. Signs, the stack effect, vapor barriers vs encapsulation, and prevention.
Out of sight, out of mind—that's how most homeowners treat their crawl space. But this hidden area beneath your home can harbor one of the most destructive mold problems you'll ever face. Crawl space mold threatens your home's structural integrity, degrades indoor air quality, and can spread undetected for years.
In This Guide
- Why Crawl Spaces Get Mold — Moisture sources and the stack effect
- Signs of Crawl Space Mold — What to look for inside and below
- Structural Concerns — Floor joist, sill plate, and subfloor damage
- Encapsulation Explained — Vapor barriers vs. full encapsulation
- Professional Remediation — The 3-phase process
- Next Steps — What to do if you suspect mold
The Hidden Danger: Crawl Space Mold
Your crawl space is the foundation support system for your entire home. When mold takes hold down there, it doesn't just sit quietly—it actively damages structural components and affects the air you breathe every day.
Why Crawl Spaces Are Vulnerable
Crawl spaces combine several factors that make them ideal for mold:
- Direct earth contact - Ground moisture constantly evaporates upward
- Limited ventilation - Traditional vented crawl spaces trap humid air
- Cool surfaces - Floor joists and subflooring stay cooler than ground air
- Darkness - Mold thrives without UV light to inhibit growth
- Neglect - Rarely inspected, problems grow unchecked
The Stack Effect
Your home acts like a giant chimney. Warm air rises and exits through the upper levels, pulling replacement air up from below. Studies show that 40-50% of the air on your first floor comes from your crawl space. If there's mold down there, you're breathing mold spores up here.
Why Crawl Spaces Develop Mold
Understanding the moisture sources helps you prevent future problems after remediation.
Ground Moisture
The soil beneath your home contains moisture that constantly evaporates. In an unprotected crawl space, this moisture rises directly into the space, creating humidity levels that often exceed 70-80%—well above the 60% threshold where mold thrives.
Vented Crawl Space Problems
For decades, building codes required vented crawl spaces, assuming outside air would dry out moisture. In reality, vented crawl spaces often make moisture problems worse:
- Warm, humid summer air enters and condenses on cool surfaces
- Winter air can freeze pipes and create its own condensation issues
- Vents allow pest entry and make climate control impossible
Note: Modern building science favors sealed, conditioned crawl spaces over traditional vented designs. Similar moisture dynamics affect basements — understanding both helps with whole-home moisture control.
Plumbing Leaks
Crawl spaces typically house plumbing runs, water heaters, and sometimes HVAC equipment. Common leak sources include:
- Supply line connections and fittings
- Drain line cracks or disconnections
- Water heater failures
- Condensation from HVAC equipment
- Washing machine drain lines
Poor Drainage
Water intrusion from outside the home creates acute moisture events:
- Foundation wall leaks during heavy rains
- Improper grading directing water toward the home
- Failed or missing foundation drains
- Downspouts discharging too close to the foundation
Crawl space moisture is especially common in the Southeast. If you're in Georgia, see our listings for Atlanta and Savannah to find local professionals experienced with crawl space issues.
Signs You Have Crawl Space Mold
Because crawl spaces are rarely entered, mold often grows extensively before discovery. Watch for these indicators:
Signs Visible from Inside Your Home
- Musty odors on the first floor, especially noticeable in winter
- Sagging, uneven, or bouncy floors
- Increased allergy symptoms among household members
- Higher than expected humidity levels indoors
- Mold growth on first-floor walls or closets
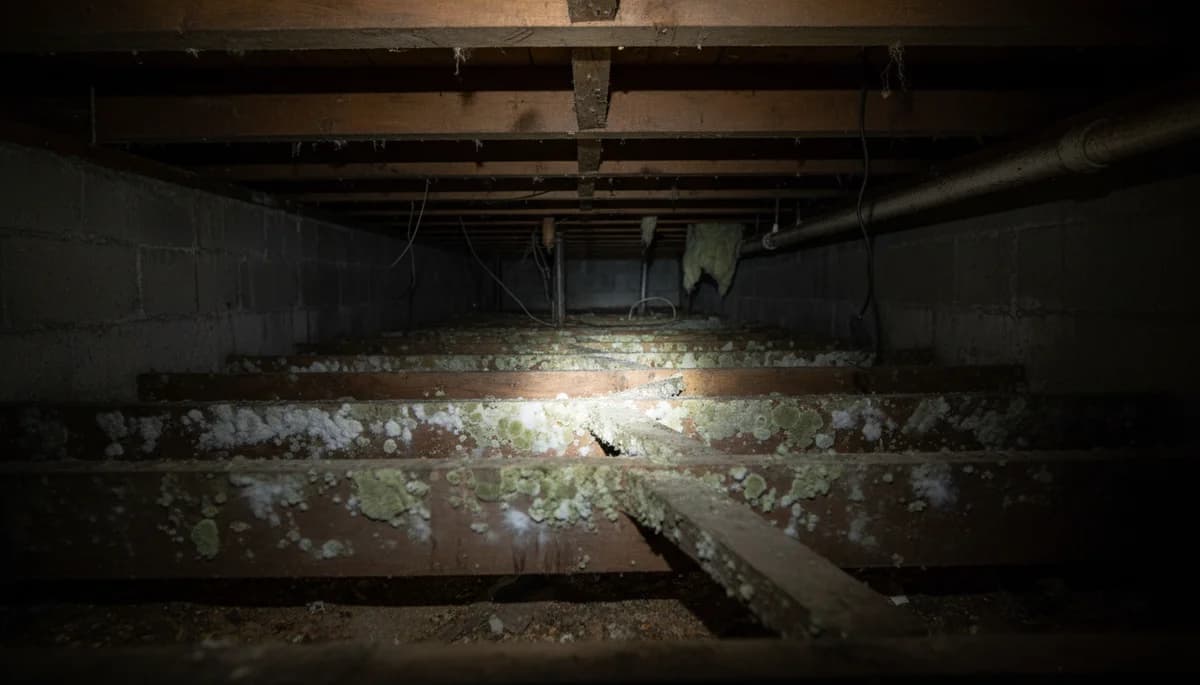
Signs in the Crawl Space
- Visible mold growth on floor joists, subflooring, or sill plates
- White, fuzzy growth (mold) vs. white crystalline growth (efflorescence)
- Dark staining on wood surfaces
- Standing water or perpetually damp soil
- Wet or deteriorating insulation
- Wood that feels soft or punky when probed
Professional Detection
Some crawl space mold requires professional detection by a mold assessor:
- Mold behind insulation
- Contamination inside HVAC ducts
- Early-stage growth not visible to the untrained eye
- Air quality testing to confirm spore levels
Structural Concerns
Crawl space mold doesn't just affect air quality—it attacks your home's structural components.
Floor Joist Damage
Floor joists carry the weight of your entire first floor. When mold colonizes these beams:
- Wood fibers break down, reducing load-bearing capacity
- Joists can sag, warp, or develop soft spots
- Sister joists or full replacement may become necessary — remediation costs can escalate quickly with structural involvement
- Floors above become bouncy, uneven, or develop squeaks
Sill Plate Deterioration
The sill plate sits directly on the foundation and supports the entire floor system. Mold damage here is particularly serious:
- Compromises the connection between foundation and framing
- Can allow structural movement
- Expensive and complex to repair
Subfloor Damage
The plywood or OSB subfloor is another common mold target:
- Delamination and swelling from moisture
- Mold growth on underside affecting floor above
- May require replacement during remediation
Warning: If you notice significant structural damage—soft wood, visible sagging, or widespread decay—contact both a mold professional and a structural engineer. Remediation alone may not address structural compromises.
Encapsulation Explained
Crawl space encapsulation has become the gold standard for crawl space moisture and mold control. Here's what it involves and why it works.
What Is Encapsulation?
Encapsulation transforms your crawl space from a damp, vented space into a clean, dry, conditioned space. The process includes:
- Removing existing contamination - Mold remediation, debris removal, and cleaning
- Installing a vapor barrier - Heavy-duty liner covering the entire floor and often walls
- Sealing vents and openings - Closing off outside air entry
- Conditioning the space - Adding dehumidification or conditioned air supply
- Drainage provisions - Sump pump if needed for water intrusion

Benefits of Encapsulation
- Eliminates ground moisture evaporation
- Prevents future mold growth
- Improves energy efficiency (can reduce heating/cooling costs 15-20%)
- Reduces pest entry
- Creates usable storage space
- Protects structural components long-term
Encapsulation vs. Vapor Barrier Only
A vapor barrier alone (plastic sheeting on the ground) provides some moisture reduction but doesn't achieve the same results as full encapsulation:
| Aspect | Vapor Barrier Only | Full Encapsulation |
|---|---|---|
| Ground moisture | Reduced | Eliminated |
| Wall moisture | Unaddressed | Controlled |
| Humidity control | Passive | Active |
| Outside air | Still enters | Sealed out |
| Long-term protection | Moderate | Excellent |
Vapor Barriers and Dehumidification
These are the key components of a moisture-controlled crawl space.
Vapor Barrier Selection
Not all vapor barriers are created equal:
- Thickness - Minimum 12 mil; 20 mil preferred for durability
- Material - Reinforced polyethylene or similar
- Seams - Overlapped and sealed with appropriate tape
- Coverage - Floor and ideally walls up to grade level
- Attachment - Secured to walls and around piers
Dehumidification Options
A conditioned crawl space needs humidity control:
Crawl space dehumidifiers:
- Designed for low-clearance, harsh environments
- Self-draining with pump or gravity drain
- Sized for the cubic footage of your crawl space
- Should maintain 50-55% relative humidity
Conditioned air supply:
- Some systems use supply air from the home's HVAC
- Requires proper system sizing and return air path
- Can be more energy efficient than standalone dehumidifiers
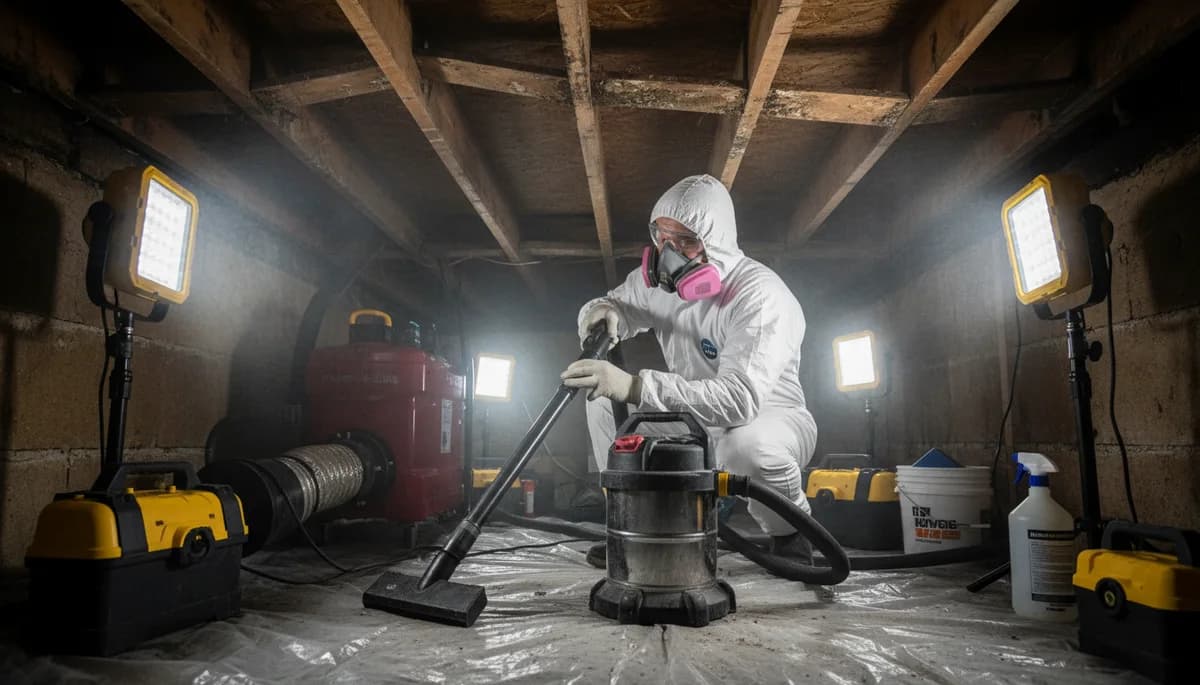
Professional Remediation Process
Crawl space mold remediation requires specialized equipment and expertise. Here's what to expect:
Assessment Phase
A thorough assessment includes:
- Visual inspection of all accessible areas
- Moisture readings on wood and other materials
- Humidity and temperature measurements
- Identification of moisture sources
- Documentation of affected areas
- Assessment of structural integrity
Remediation Phase
Professional remediation typically involves:
- Setup - Creating access, setting up lighting and ventilation
- Containment - Preventing spore spread to living areas
- Removal - Taking out damaged insulation, debris, and unsalvageable materials
- Cleaning - HEPA vacuuming all surfaces, wire brushing affected wood
- Treatment - Applying antimicrobial solutions to affected areas
- Drying - Using commercial equipment to dry materials below 15% moisture
Prevention Phase
After remediation, prevention measures are installed:
- Vapor barrier or full encapsulation
- Dehumidification system
- Drainage improvements if needed
- Vent sealing (for encapsulation)
- Ongoing monitoring recommendations
Next Steps
If you suspect crawl space mold:
- Prioritize professional inspection - Crawl spaces are difficult to assess safely without proper equipment
- Don't disturb the area - Entering can spread spores into your home
- Address obvious water problems - Fix visible leaks while awaiting assessment
- Plan for prevention - Budget for encapsulation, not just remediation
- Get multiple quotes - Approaches and pricing vary significantly — see our inspection cost guide for what to expect
📚 This guide is part of our Complete Mold Remediation Guide—your comprehensive resource for understanding, preventing, and removing mold.
Frequently Asked Questions
What causes mold in a crawl space?
How much does crawl space mold remediation cost?
Should I encapsulate my crawl space?
How do I know if my crawl space has mold?
Is crawl space mold dangerous to my health?
What is the difference between a vapor barrier and full encapsulation?
This guide is for educational purposes only. Always consult with certified professionals for specific mold situations in your home. If you experience health symptoms, please consult a healthcare provider.