DIY vs Professional Mold Removal: The 10 Sq Ft Rule
EPA says under 10 sq ft = DIY safe. Over 10 sq ft = hire a pro. Step-by-step DIY process, safety gear, what kills mold permanently, and when to call a professional.
Discovering mold in your home raises an immediate question: Can I handle this myself, or do I need to call a professional? The answer depends on several factors, and making the right choice is crucial for both your safety and your wallet.
This guide will help you make that decision with confidence, covering EPA guidelines, safety requirements, step-by-step DIY instructions, and clear indicators for when professional help is essential.
In This Guide
- When DIY is Appropriate — EPA guidelines and assessment checklist
- Safety Precautions — PPE and critical warnings
- DIY Step-by-Step — 6-step removal process
- When to Hire a Pro — Clear indicators for professional help
- Professional Process — What to expect and questions to ask
- Can I Remove Black Mold Myself? — When DIY is risky
- The EPA 10 Sq Ft Rule — The standard threshold
- Next Steps — Getting started
When DIY Mold Removal is Appropriate
According to the Environmental Protection Agency (EPA), homeowners can generally tackle mold cleanup themselves when the affected area is less than 10 square feet—roughly the size of a bathtub (about 3 feet by 3 feet).
DIY-Appropriate Conditions
Before deciding to handle mold removal yourself, confirm all of these conditions are met:
- Size: The total affected area is under 10 square feet
- Surface type: Mold is on non-porous surfaces (tile, glass, metal, sealed wood) or semi-porous surfaces (concrete, wood) where you can physically remove it
- Location: Mold is on visible, accessible surfaces—not inside walls, ducts, or structural materials
- Mold type: No suspected black mold (Stachybotrys chartarum)
- Source: You've identified and fixed the moisture source
- Health status: No household members have compromised immune systems, severe allergies, or respiratory conditions
DIY Assessment Checklist
Use this checklist before starting any DIY mold removal:
- Measure the area: Is the mold growth under 10 square feet total?
- Identify the surface: Is it non-porous (tile, glass) or removable (bathroom caulk)?
- Check for moisture: Have you found and fixed the water/humidity source?
- Assess your health: Are you and household members healthy without respiratory issues?
- Examine the color: Is the mold light-colored (white, green, gray) rather than black?
- Check HVAC proximity: Is the mold away from air ducts and HVAC systems?
If you answered "yes" to all of these, DIY removal may be appropriate. If any answer is "no," consider professional help.
Safety First: Essential Precautions
Even for small DIY mold removal projects, proper safety precautions are critical. Mold releases spores when disturbed, which can cause health issues if inhaled.
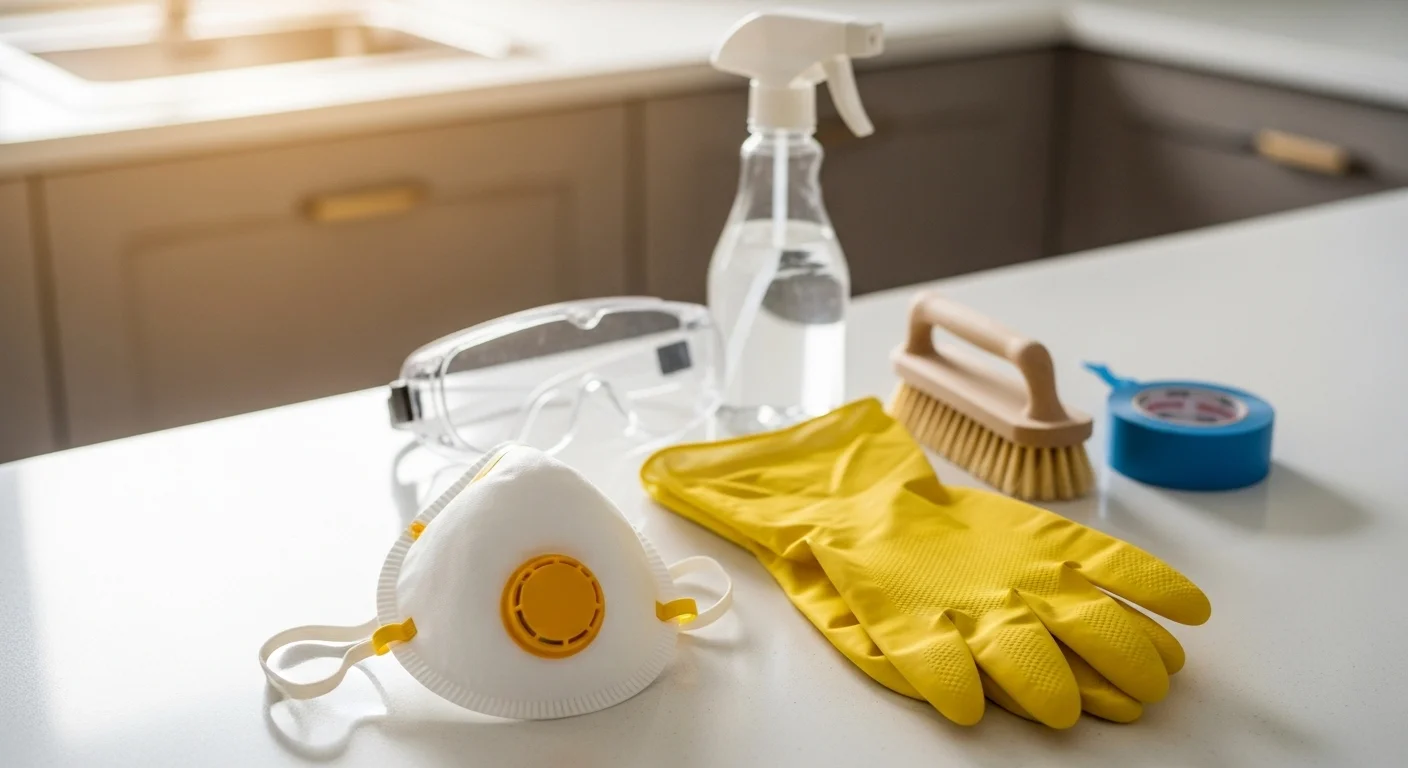
Required Personal Protective Equipment (PPE)
Before starting any mold removal, gather:
- N95 respirator mask (minimum)—not a simple dust mask
- Safety goggles without ventilation holes
- Rubber gloves extending to mid-forearm
- Long-sleeved shirt and long pants
- Disposable shoe covers (optional but recommended)
Warning: Never use cloth masks or surgical masks for mold cleanup. These don't filter mold spores effectively. Always use at least an N95 respirator.
Critical Safety Warnings
Warning: Black Mold — Never attempt to remove suspected black mold (dark greenish-black, slimy texture) yourself. Learn to identify black mold before making a decision. Black mold exposure has been linked to serious health effects. If you suspect black mold, do not disturb it and contact a professional immediately.
Warning: Health Conditions — If anyone in your household has a compromised immune system, severe allergies, asthma, or other respiratory conditions, they should not be present during or immediately after mold cleanup. Consider professional remediation for added safety.
Warning: HVAC Systems — If mold is in or near your HVAC system, do not run the system until a professional has assessed it. Running the HVAC can spread mold spores throughout your entire home.
How to Remove Mold Yourself
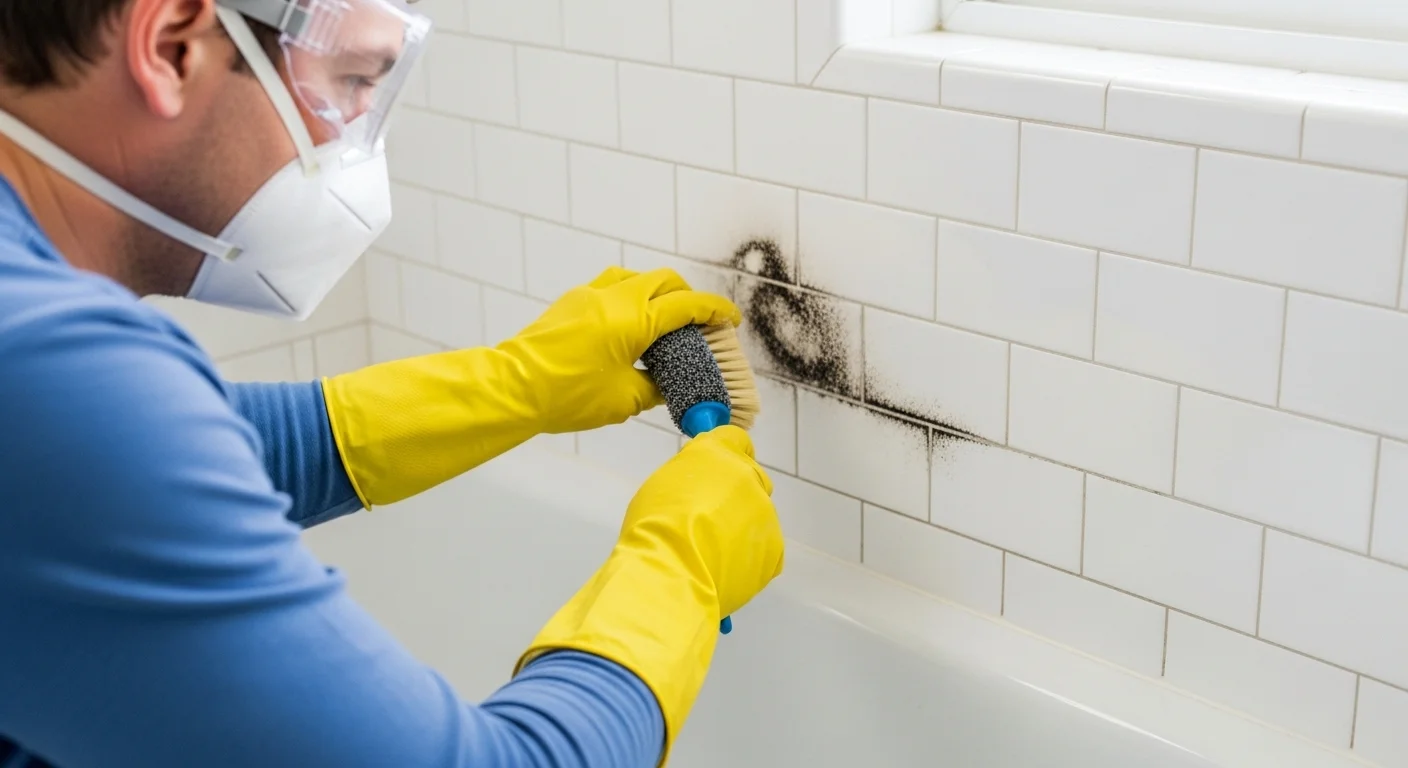
If your situation meets the DIY criteria and you have proper safety equipment, follow these steps for effective mold removal.
Step 1: Prepare the Area
- Turn off HVAC systems to prevent spore spread
- Open windows in the work area for ventilation
- Seal doorways to other rooms with plastic sheeting
- Remove or cover furniture and belongings in the area
- Lay plastic sheeting on the floor to catch debris
Step 2: Put on Protective Equipment
- Don your N95 respirator and ensure a proper seal
- Put on safety goggles
- Wear rubber gloves
- Put on long-sleeved clothing
Step 3: Wet the Mold
- Lightly mist the moldy area with water
- This prevents spores from becoming airborne when disturbed
- Don't soak the area—just dampen the surface
Step 4: Remove the Mold
For hard, non-porous surfaces (tile, glass, metal, plastic):
- Mix a cleaning solution: either commercial mold cleaner, or 1 cup bleach per gallon of water, or undiluted white vinegar
- Apply the solution to the moldy surface
- Scrub with a stiff brush or non-scratch pad
- Rinse with clean water
- Repeat if necessary
For wood and semi-porous surfaces:
- Scrub with detergent and water first
- Allow to dry completely
- If staining remains, apply diluted bleach (1 cup per gallon)
- Scrub and rinse
- Dry thoroughly—moisture is your enemy
For caulk, grout, and sealant:
- If mold is embedded, remove the old caulk/grout entirely
- Clean the underlying surface
- Allow to dry completely
- Apply new caulk or grout
Step 5: Clean Up Properly
- Place all cleaning materials in sealed plastic bags
- HEPA vacuum the entire work area
- Wipe down all surfaces with damp cloths
- Dispose of cleaning materials, gloves, and cloths in sealed bags
- Wash clothing separately in hot water
Step 6: Dry the Area
- Use fans and dehumidifiers to dry the area completely
- Keep humidity below 60% (ideally 30-50%)
- Continue running a dehumidifier for several days
- Monitor for any signs of mold return
Recommended Products and Equipment
Cleaning Solutions:
- Commercial mold and mildew removers (look for EPA-registered products)
- White vinegar (undiluted) — kills 82% of mold species
- Household bleach (diluted 1:10 with water)
- Borax solution (1 cup per gallon of water)
Equipment:
- Dehumidifier (essential for prevention)
- HEPA vacuum cleaner
- Stiff-bristle brush or scrub pad
- Spray bottles
- Plastic sheeting
PPE:
- N95 respirator masks (stock multiple)
- Safety goggles without vents
- Long rubber gloves
- Disposable coveralls (optional)
Shop Recommended Products
Recommended Safety Equipment
N95 Respirator Masks (10-Pack)
Safety EquipmentNIOSH-approved N95 masks. Essential for mold cleanup. Filters 95% of airborne particles.
Safety Goggles (No Vents)
Safety EquipmentSealed safety goggles without ventilation holes. Prevents spores from reaching eyes. Anti-fog coating.
Long Rubber Gloves (2 Pairs)
Safety Equipment26-inch PVC gloves extending past the elbow. Chemical resistant for mold cleanup.
Disposable Coveralls (5-Pack)
Safety EquipmentFull-body protective coveralls. Protects clothing from mold exposure. Disposable after use.
Recommended Dehumidifiers
Portable 30-Pint Dehumidifier
DehumidifierIdeal for small spaces up to 1,500 sq ft. Quiet operation with auto-shutoff when tank is full.
50-Pint Dehumidifier with Pump
DehumidifierBest for medium spaces up to 3,000 sq ft. Built-in pump for continuous drainage.
Commercial 70-Pint Dehumidifier
DehumidifierHeavy-duty for large spaces up to 4,500 sq ft. Professional-grade with auto-restart.
Recommended Mold Test Kits
Surface Mold Test Kit
Test KitDIY mold test with lab analysis included. Quick surface sampling for visible mold concerns.
Air Quality Mold Test Kit
Test KitTests airborne mold spores. Includes lab analysis fee. Results within 5 business days.
Comprehensive Mold Test Kit
Test KitSurface + air sampling with professional lab analysis. Identifies mold species. Most accurate DIY option.
After Cleanup: Verification Tips
Don't assume the job is done just because visible mold is gone:
- Monitor daily for 1-2 weeks for any mold return
- Check moisture levels with a moisture meter if available
- Smell test — musty odors may indicate hidden mold
- Watch for symptoms — if health issues return, mold may still be present
- Address the source — ensure the original moisture problem is truly fixed
If mold returns despite proper cleanup, this indicates an unresolved moisture issue or mold in locations you couldn't reach. At this point, professional help is necessary.
When to Hire a Professional
Certain situations require professional expertise and equipment. Don't attempt DIY remediation if any of these apply:
Size Exceeds 10 Square Feet
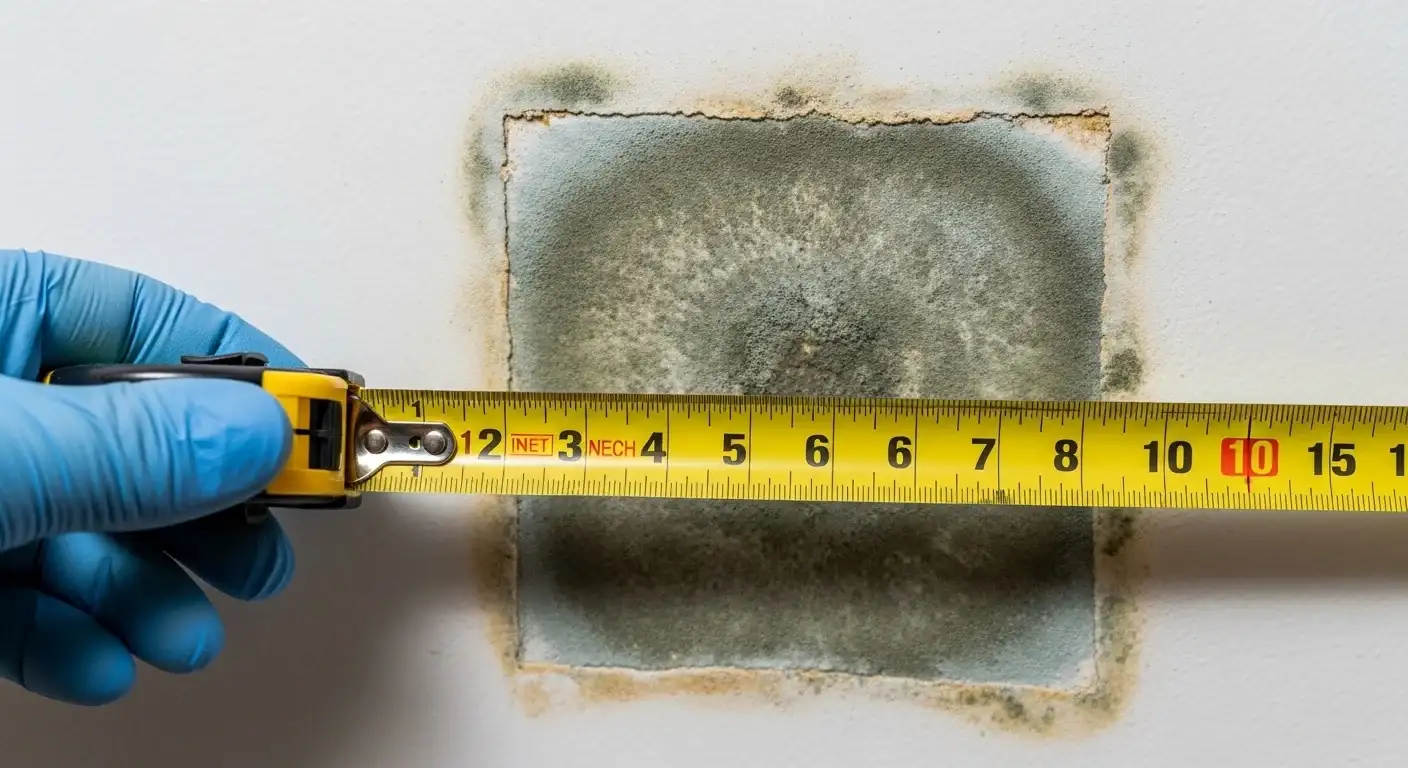
Once mold covers more than about 10 square feet, the scope of work exceeds what's safe for DIY:
- Larger areas require professional containment procedures
- More spores are released, creating greater health risks
- The underlying moisture problem is likely more extensive
HVAC System Contamination
If mold is growing in or near your HVAC ducts, vents, or air handler:
- Running the system spreads spores to every room
- Duct cleaning requires specialized equipment
- The entire system may need professional treatment
- Improper cleaning can make the problem worse
Structural Materials Affected
Professional help is essential when mold has reached:
- Framing and studs — load-bearing elements
- Subfloor — under tile, hardwood, or carpet
- Insulation — almost impossible to clean; must be replaced
- Drywall interior — contamination inside wall cavities
- Roof decking — structural integrity concerns (see attic mold guide)
Health Symptoms Present
If anyone in your household is experiencing:
- Persistent respiratory issues (coughing, wheezing, shortness of breath)
- Recurring sinus infections
- Chronic headaches that improve away from home
- Skin rashes or eye irritation
- Fatigue or difficulty concentrating
These symptoms suggest significant exposure that warrants professional assessment and remediation.
Black Mold Suspected
Black mold (Stachybotrys chartarum) characteristics:
- Dark greenish-black color
- Slimy or wet texture when active
- Musty, earthy odor
- Often in areas with chronic water damage
Never disturb suspected black mold — use our visual identification guide if you're unsure what you're looking at. Professional remediators have proper containment and safety protocols.
Recurring Mold Despite Cleanup
If you've cleaned mold and it returns within weeks or months:
- The moisture source hasn't been fully addressed
- Hidden mold exists in areas you can't see — common in basements and crawl spaces
- The problem is more extensive than surface-level
- Professional moisture testing and inspection is needed
Water Damage Source Unknown
If you can see mold but can't identify where the water is coming from:
- A professional can use moisture meters and thermal imaging
- Hidden leaks may exist in walls or under floors
- Foundation issues may be allowing moisture intrusion
- Plumbing problems may be hidden
What Professional Remediation Involves
Understanding the professional process helps you evaluate quotes and know what to expect.
Initial Assessment
A licensed mold assessor will:
- Conduct thorough visual inspection
- Use moisture meters to find hidden water
- Take air and/or surface samples if needed
- Identify moisture sources
- Determine scope of contamination
- Provide written report with recommendations
Note: In many states, mold assessors must be licensed separately from remediators. This prevents conflicts of interest. Learn more about choosing between an assessor and remediator in our assessor vs remediator guide.
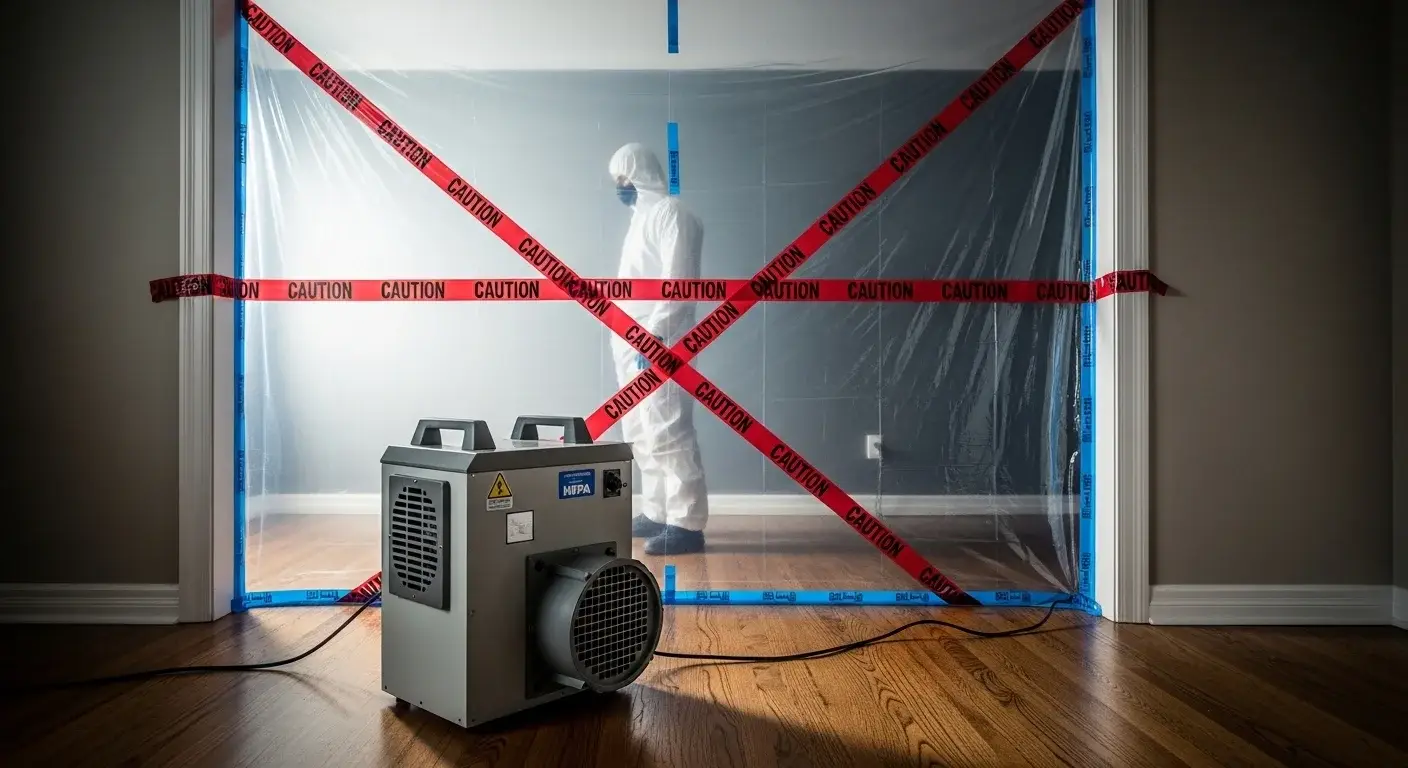
Remediation Process
Professional remediation typically includes:
- Containment — Sealing off affected areas with plastic barriers
- Negative air pressure — Preventing spores from spreading
- Air filtration — HEPA air scrubbers running continuously
- Removal — Physical removal of contaminated materials
- Cleaning — HEPA vacuuming and antimicrobial treatment
- Disposal — Proper disposal of contaminated materials
- Verification — Post-remediation testing to confirm success
Timeline and Costs
Typical project timelines:
- Small projects (10-30 sq ft): 1-3 days
- Medium projects (30-100 sq ft): 3-5 days
- Large projects (100+ sq ft): 1-2 weeks
- Full house remediation: 2-4 weeks
For detailed cost information, see our mold remediation cost guide.
Questions to Ask Contractors
Before hiring, ask potential contractors:
- Are you licensed? (Required in many states for mold work)
- Are you insured? (Should have general liability and workers' comp)
- What certifications do you hold? (IICRC, ACAC, or state-specific)
- Will you provide a written scope of work?
- What containment procedures do you use?
- Do you include post-remediation testing?
- What's your warranty on the work?
- Can you provide recent references?
For the full list of questions organized by project phase — screening, assessment, remediation, and follow-up — see our questions to ask a mold company guide. And watch out for common scams when evaluating contractors.
Can I Remove Black Mold Myself?
This is the most common question homeowners ask — and the answer is more nuanced than a simple yes or no.
The EPA's 10 square foot rule doesn't distinguish between mold types. In theory, if black mold is on a hard surface and covers less than 10 square feet, the DIY guidelines apply.
In practice, black mold (Stachybotrys) presents unique challenges:
- It's rarely on an easy surface. Stachybotrys thrives on chronically wet cellulose materials — drywall, wood, ceiling tiles. These are porous materials that can't be fully cleaned with surface scrubbing. The affected section typically needs to be cut out and replaced.
- It indicates a serious moisture problem. Black mold doesn't grow from a one-time leak. It requires sustained moisture over days to weeks. If you're seeing Stachybotrys, there's likely an ongoing water source you haven't found yet.
- Disturbing it spreads spores. Without professional containment (plastic barriers, negative air pressure, HEPA filtration), cutting into mold-contaminated drywall sends spores airborne throughout your home.
The safe approach: If you suspect black mold, get a professional mold assessment first ($300-$700). The assessor will confirm the mold type, identify the moisture source, and determine whether DIY cleanup is appropriate or whether professional remediation is needed. That $400 investment buys you certainty.
What Is the EPA 10 Square Foot Rule for Mold?
The EPA's guideline is the standard threshold for deciding between DIY and professional mold removal.
The rule: If the mold-affected area is less than 10 square feet (roughly 3 feet by 3 feet — about the size of a bathtub), homeowners can generally handle cleanup themselves using proper safety equipment.
Above 10 square feet, the EPA recommends professional remediation with containment equipment, HEPA filtration, and trained personnel. The risk isn't just about the current mold — it's about what happens when you disturb it. Larger areas release significantly more spores when cleaned, and without professional containment, those spores spread to other rooms.
What the rule doesn't cover:
- Location matters more than size. A 5 sq ft patch of mold inside a wall cavity is more dangerous to clean than a 12 sq ft patch on bathroom tile, because accessing it requires cutting into walls.
- HVAC mold is always professional. Mold in duct systems can spread throughout your entire home when the system runs, regardless of the affected area size.
- Health conditions change the equation. If anyone in your household has asthma, allergies, or a compromised immune system, lower your threshold for calling a professional.
Not Sure? Get Professional Help
When in doubt, a professional assessment is relatively affordable ($300-$700) and provides peace of mind. The cost of a professional evaluation is far less than the cost of health problems or property damage from improperly handled mold.
Your Next Steps
- Assess your situation using the DIY checklist above
- Measure the affected area to determine if it's under 10 sq ft
- Identify the moisture source — this must be fixed regardless of who does the cleanup
- Make your decision — DIY for small, accessible, non-black mold, or professional for everything else
If you're leaning toward professional help, or just want a second opinion on your DIY situation, connect with verified professionals in your area.
Find a Verified Mold Professional
Don't trust your home and health to just anyone. Find a verified mold assessor or remediator in your area who has been vetted for proper licensing, insurance, and professional reputation.
📚 This guide is part of our Complete Mold Remediation Guide—your comprehensive resource for understanding, preventing, and removing mold.
Frequently Asked Questions
What kills mold permanently?
Is it safe to remove mold yourself?
How do you remove mold from walls permanently?
When should you hire a professional for mold?
Does bleach kill mold?
How much does professional mold removal cost?
Can I remove black mold myself?
What is the EPA 10 square foot rule for mold?
When the job is beyond DIY, you can find a verified mold removal company near you — every contractor is license-checked and insurance-checked before they go live on the site.
This guide is for educational purposes only. Always prioritize safety and consult with certified professionals if you have any doubts about your mold situation. If you experience health symptoms, please consult a healthcare provider.