How to Test for Mold: When You Need It (2026)
Most homeowners don't need a mold test. When testing actually matters, DIY kits ($10–$150) vs pro inspection ($300–$900), and what results mean.
You spotted something on the wall, smelled something musty after the last rain, or had a pipe leak last month and you're not sure what's growing back there. Now you're trying to figure out whether to spend money on a mold test, and which kind, and whether the at-home kit at Home Depot is actually telling you anything useful.
Here's the short version. Most homeowners who can see or smell mold don't need to test first; they need to find the moisture source and clean it up. Testing matters in a smaller set of situations, and when it does, the difference between a $30 petri dish and a $600 professional inspection is significant.
Do You Actually Need a Mold Test?
The CDC's official position will surprise you. They say if you can see mold, or you can smell it in a damp area, you don't need to test. You just need to remove it and fix the moisture problem that grew it. The Minnesota Department of Health says the same thing.
That stance contradicts most of what you'll find online, where every page assumes the answer is yes, run a test. So here's a clearer way to decide.
When testing is unnecessary
If you can see a small patch of mold (under 10 square feet) and you know where the water came from, skip the test. A bottle of cleaner, a respirator, and an hour of work will resolve it. Confirming "yes, this is mold" with a $40 kit doesn't change what you do next.
When testing actually matters
A handful of situations make testing worth the money:
- You have unexplained respiratory symptoms or allergies that improve when you leave the house
- You had recent water damage and need documentation for an insurance claim
- You're buying or selling a home and need an objective record
- You suspect hidden mold (musty smell, no visible source) and want to confirm before opening walls
- You just paid for remediation and need clearance testing to verify the work
If none of those apply and you can already see what mold actually looks like, spend the money on cleaner and a dehumidifier instead.
The CDC stance and why it matters
The CDC isn't being lazy. Their reasoning is that mold spores exist in every home; the question is whether the levels are abnormal, and the answer to that is mostly "if you can see mold, yes." A test confirms what your eyes already told you.
How Do You Test for Mold? Two Real Options
If you've decided testing is warranted, you have two paths. Be honest with yourself about which one fits your situation.
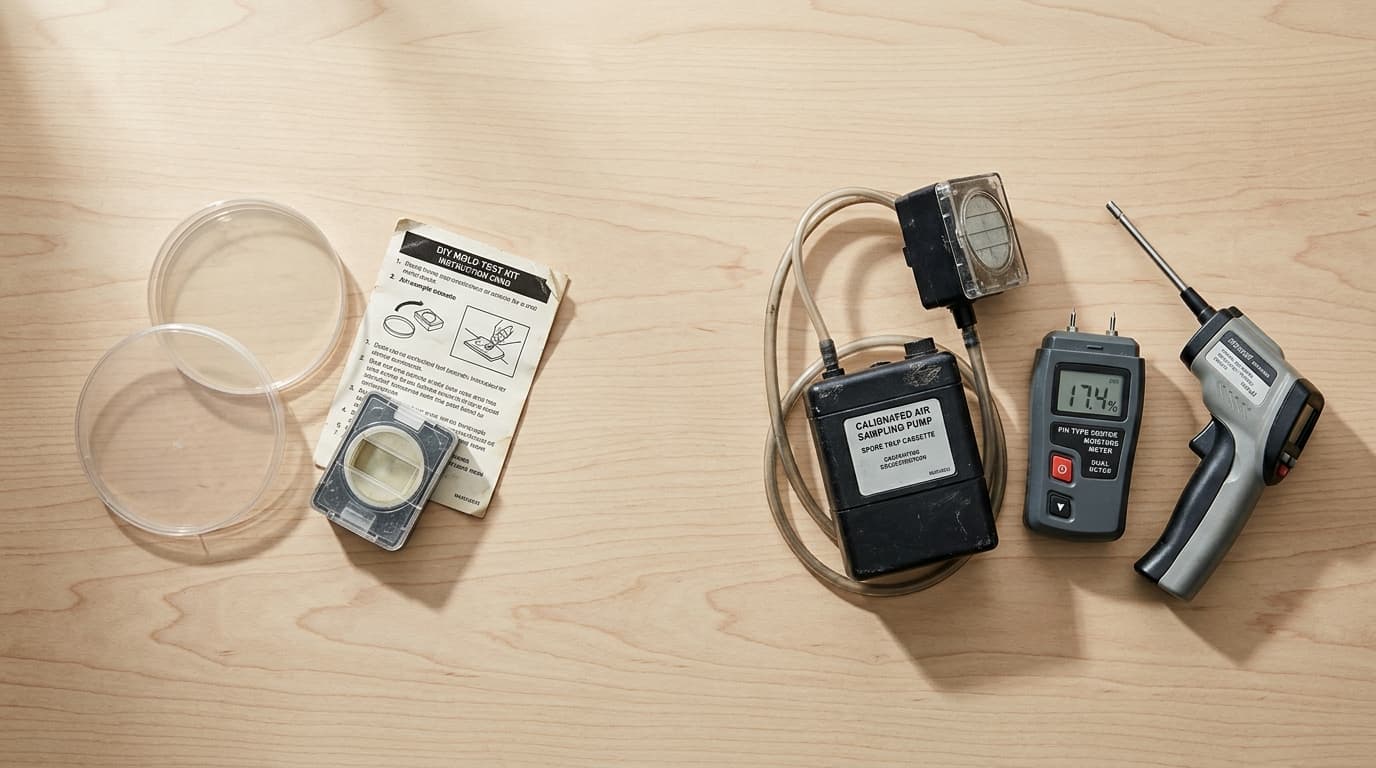
DIY testing kits ($10–$150)
There are two kinds of DIY kits and they're not equivalent.
The cheap petri dish kits ($10–$30) ask you to leave a culture plate open on the counter for an hour, then mail it in. These are nearly useless. They confirm spores exist, which is true in every house in America. They don't tell you concentration, location, or species in any way that helps you decide what to do.
The decent ones ($50–$150) collect air samples on cassettes that go to an accredited lab. The lab counts spores per cubic meter and identifies common species. That's actual data. Not as good as professional sampling (no calibrated pump, no comparison sample, no interpretation); however, useful as a screening step before you spend on a pro. Look for the words "accredited lab analysis" on the box.
Professional mold inspection ($300–$900)
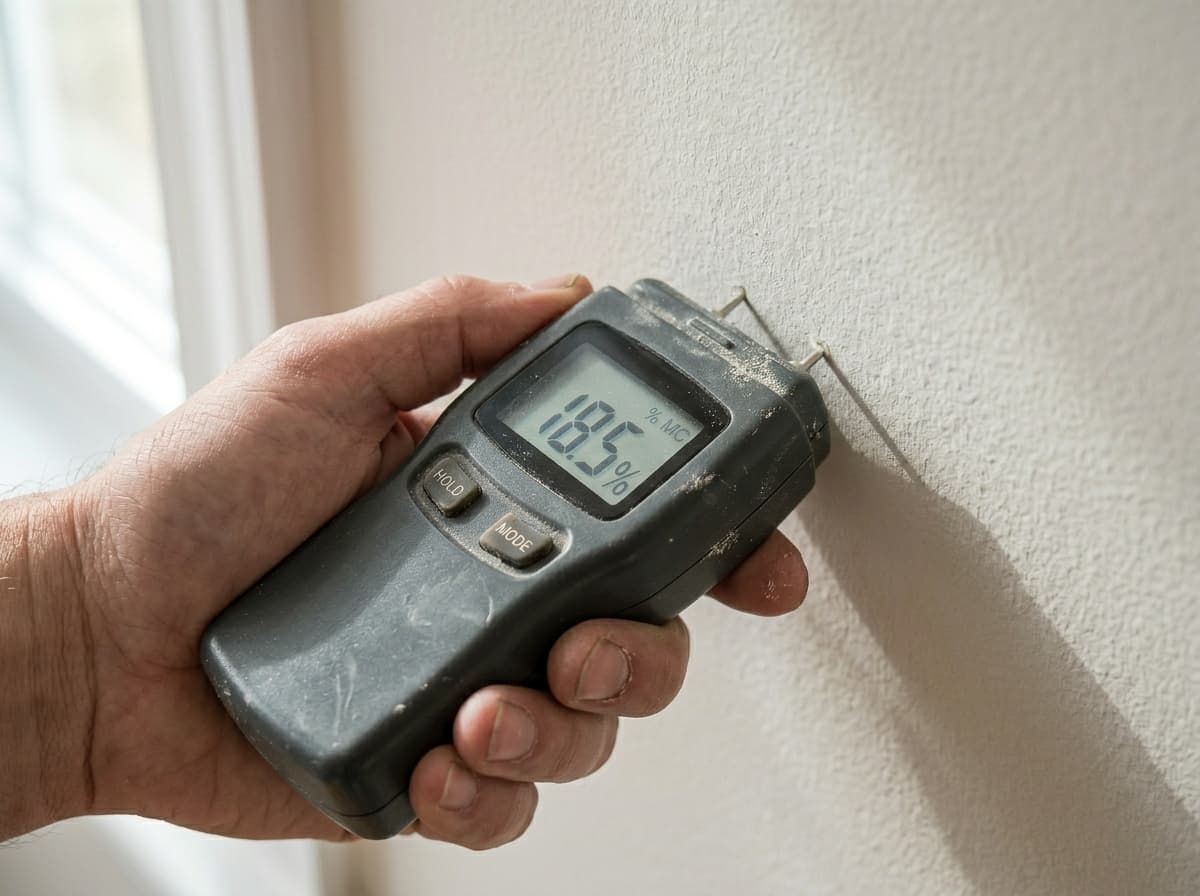
A licensed mold assessor brings a calibrated air pump that pulls a measured volume of air through a spore trap, takes a baseline outdoor sample for comparison, runs moisture meters on suspect surfaces, and uses thermal imaging to find cold spots that signal water behind walls. Surface samples (tape lifts and swabs) go in if they spot something. Lab analysis is included. So is interpretation by someone who's done this hundreds of times.
Cost depends on what you ask for. A visual inspection with moisture detection runs $150–$300. Inspection plus a couple of lab-analyzed air samples is $300–$600. Full-scope testing with multiple air and surface samples is $500–$900. See what professional mold testing typically costs for the full breakdown by region and scope.
When you're ready to book, browse licensed mold inspection companies; every pro listed is identity-checked, with state licenses verified where the state licenses mold work.
A cheaper first step most people skip
Before you spend on spore tests, spend $25–$80 on a hygrometer and a moisture meter. The hygrometer tells you indoor humidity (above 60% supports mold growth; you want under 50%). The moisture meter tells you whether a suspicious spot is actually wet behind the surface. If both come back normal, you might not have an active problem at all, just a cosmetic stain from an old leak.
If there is visible growth rather than just a stain, tell mold from mildew before you test: flat, powdery mildew on tile or grout is a cleaning job, not a testing one.
What About Mold Toxicity Tests in Your Body?
This is a category where the marketing is well ahead of the science. Be careful what you buy.
What doctors actually test for
A regular allergist can test for mold-specific IgE and IgG antibodies via blood draw. That tells you whether your immune system has reacted to mold exposure. Functional medicine specialists sometimes order mycotoxin urine tests; the medical mainstream is skeptical of how those are interpreted, and most insurance won't cover them.
If you suspect mold is making you sick, start with your primary doctor. Ask for an environmental allergy panel. If you want to go further, find a board-certified allergist or immunologist, not a wellness influencer with a brand deal.
At-home mycotoxin kits: what they claim vs deliver
The home mycotoxin tests sold as "find out if mold is poisoning you" generally lack the clinical validation behind their marketing. Some labs running them have been called out by the FDA for unsupported health claims. Spend that money on a real doctor's visit and a professional home inspection instead.
How to Find a Mold Tester You Can Trust
This is where most homeowners get burned. The mold testing industry has a structural conflict of interest that no one tells you about until you're standing in a $4,000 quote you didn't expect.
Assessor vs remediator
A mold assessor tests. A mold remediator removes. They should be different companies, with no shared ownership and no referral kickbacks, because if the same business gets paid for both jobs, every test result will recommend a $5,000 remediation. Read the difference between an assessor and a remediator for why this matters and what to ask before hiring.
State-by-state licensing
Florida and Texas got serious about this. In Florida, mold assessors and remediators must hold separate licenses and can't be the same company on the same job. Texas has the same rule. Most other states have no such requirement, which means in 40 states the assessor can also be the remediator and the conflict goes uncorrected. If you're outside FL or TX, ask the assessor directly: "Do you also do remediation work, and if so, who refers you?"
Questions to ask before hiring
A short list, before you sign anything:
- What equipment do you bring (specifically: calibrated air pump, moisture meter, thermal camera)?
- Which accredited lab analyzes the samples?
- Do you also do remediation, or only assessment?
- Can I see a sample report from a recent job?
- What's included in the price, and what triggers a charge above the quote?
If they hesitate on any of these, find someone else.
What Do Mold Test Results Actually Mean?
The lab will hand you a PDF with spore counts per cubic meter, a species breakdown, and (usually) no interpretation. Reading it without getting fleeced takes a few specific moves.
Indoor vs outdoor spore counts
The only meaningful baseline is your own outdoor air. A good assessor takes both samples on the same day, in similar weather, so you can compare. Indoor counts should be similar to or lower than outdoor. If indoor counts are several times higher than outdoor, something inside is producing spores. If they're similar or lower, your indoor air is normal regardless of the absolute number.
Toxigenic species worth flagging
Not all species matter equally. Stachybotrys chartarum (the "toxic black mold" of internet legend) and Chaetomium are flagged because they produce mycotoxins and grow on water-damaged building materials. Aspergillus and Penicillium are common indoors and outdoors; high indoor counts can still indicate a problem; however, they're not automatic emergencies. Cladosporium and Alternaria are nearly everywhere and rarely cause concern.
Why there's no universal "safe" threshold
There's no federal standard for indoor mold spore concentration. The EPA has explicitly declined to set one because exposure tolerance varies wildly by person (asthmatics, immunocompromised individuals, and infants react at much lower levels). A qualified assessor reads your numbers in context, not against a fictional pass/fail line.
After You Test, What Now?
Three scenarios, three different next moves.
Results clean
Indoor counts are at or below outdoor levels. No toxigenic species at unusual concentrations. Don't celebrate by ignoring the moisture source that prompted you to test. Fix the leak, run a dehumidifier, recheck humidity readings monthly. Mold is a moisture problem first.
Results show elevated counts
The order matters: find the source, fix the source, then remediate, then re-test for clearance. Skipping straight to remediation without finding the moisture source means the mold comes back. Hire a remediator that's separate from your assessor, ideally IICRC-certified (WRT for water restoration, AMRT for applied microbial remediation).
Results unclear
If the report is ambiguous or doesn't match what you're seeing, get a second opinion from a different assessor with no business relationship to the first. Two independent samples are more useful than one well-meaning report.