How to Get Rid of Black Mold (Without Spreading Spores Everywhere)
How to get rid of black mold safely: find the moisture source, then either DIY under 10 sq ft on hard surfaces (vinegar + peroxide) or call a certified remediator. EPA-aligned protocol.
"The mistake I see most: homeowners spray bleach, watch the dark spots disappear, and think they won. Bleach didn't kill the mold — it made it transparent. The roots are still there, the moisture's still there, and it'll be back in three weeks." — Drew Fuller, Principal at Restoration 365 (IICRC Certified Firm)
To get rid of black mold safely, you do three things in order: find and fix the moisture source, decide whether the job is DIY-sized (under 10 sq ft, hard non-porous surface) or pro-sized (everything else), and execute the right protocol. Cleaning the visible growth without fixing the water is the most expensive mistake homeowners make — because you'll pay to do it twice.
The rest of this guide walks the decision tree, the EPA-recommended DIY protocol for small patches on hard surfaces, when to call a certified remediator, what professional containment actually looks like, and how to keep it from coming back.
Quick answer: Black mold on hard surfaces under 10 sq ft? You can likely handle it yourself with hydrogen peroxide + dish soap and proper PPE. Black mold on drywall, wood, or covering large areas? Call a licensed professional. Remediation costs $1,500-$5,000 for typical projects.
In This Guide
- What is black mold?: Stachybotrys vs other dark molds
- What are the health risks?: who's at risk and what symptoms to watch for
- How do I identify black mold?: where it hides and whether to test
- Does bleach actually kill mold?: why bleach is the wrong tool for porous materials
- Can I remove black mold myself?: the 10 sq ft rule
- How do I safely remove small areas?: EPA-recommended process
- When should I call a professional?: situations that require certified help
- What does professional remediation look like?: what to expect
- How much does black mold removal cost?: pricing by project size
- How do I prevent black mold?: stopping it before it starts
- FAQs: common questions answered
What Is Black Mold?
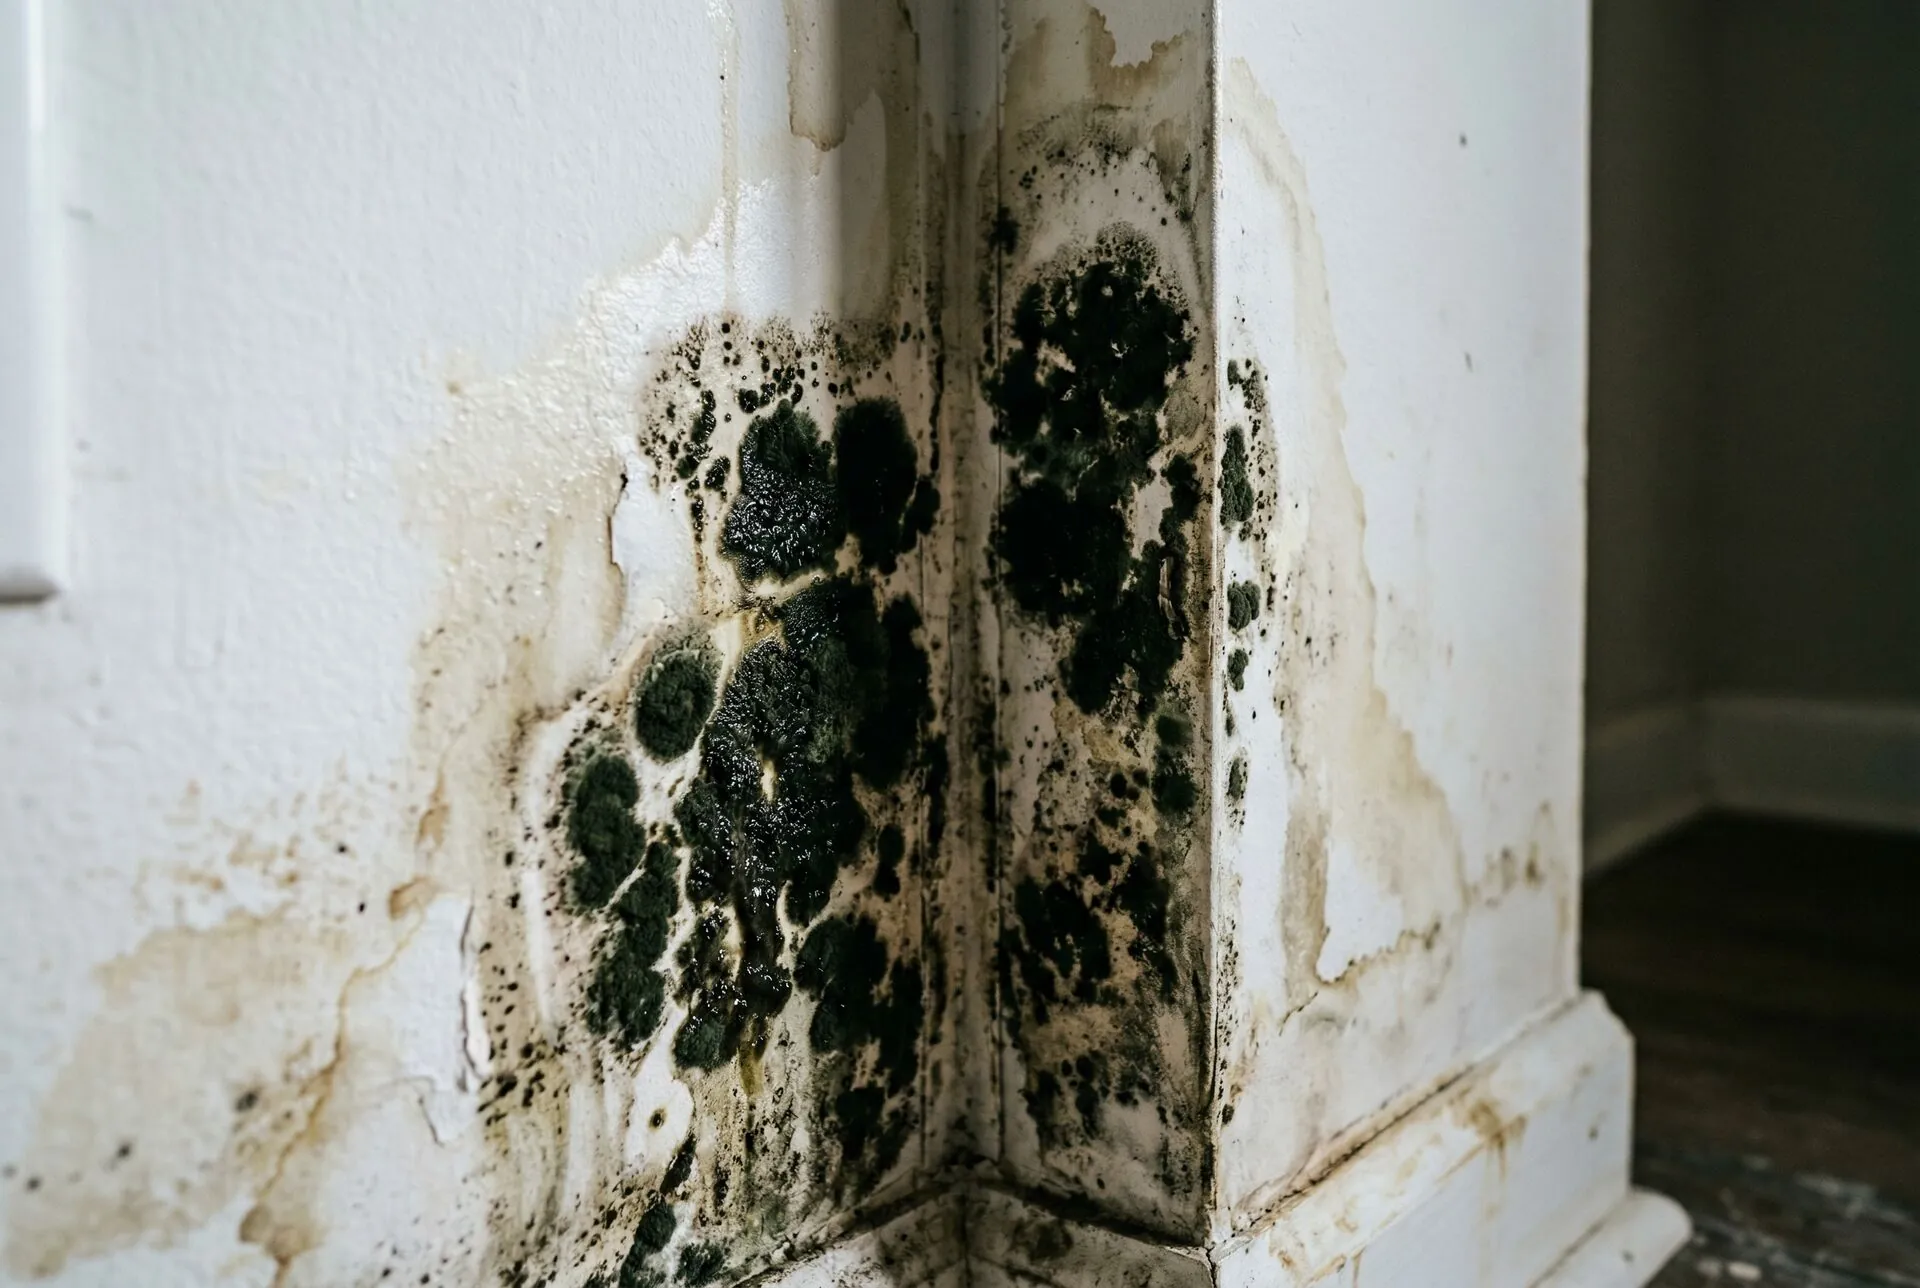
"Black mold" usually refers to Stachybotrys chartarum, a greenish-black mold that grows on materials with high cellulose content — drywall, ceiling tiles, wood, and cardboard — when they've been chronically wet for days or weeks.
But here's the critical nuance: many molds appear black, and most of them aren't Stachybotrys. Cladosporium, Aspergillus niger, and Alternaria all look dark or black and are far more common, and you can't tell them apart by color alone. The full mold identification chart shows the common dark molds side by side. If you're concerned about Stachybotrys specifically, the only way to confirm is professional mold testing. That said, any indoor mold growth should be remediated regardless of species.
For a surface-by-surface look at what black mold looks like, including how to tell it apart from soot, water stains, and other look-alikes, see the dedicated appearance guide. If the black growth is on shower tile, grout, or caulk rather than soaked drywall, it's usually one of these surface species, not Stachybotrys; the guide on black mold in the shower covers how to clean it.
Black Mold Health Risks
Stachybotrys chartarum produces mycotoxins — toxic compounds that can affect your health when inhaled or when they contact skin. Not everyone reacts the same way, but certain groups face higher risk.
Common Symptoms
- Persistent coughing and wheezing
- Nasal congestion and sinus headaches
- Eye irritation (redness, watering)
- Skin rashes or irritation
- Fatigue and difficulty concentrating
- Sore throat
Who's Most at Risk?
- Infants and young children — developing respiratory systems
- People with asthma — mold is a known asthma trigger
- People with allergies — heightened immune response
- Immunocompromised individuals — transplant recipients, HIV/AIDS, chemotherapy patients
- Elderly adults — may have reduced respiratory function
When to See a Doctor
See a doctor if you have persistent respiratory symptoms that improve when you leave the house, if symptoms started after discovering mold, or if you've had prolonged exposure (weeks or months). Bring up the mold exposure specifically — many doctors don't ask about environmental factors.
For a detailed symptom breakdown by mold type and exposure duration, see our Mold Exposure Symptoms Guide.
How to Identify Black Mold
Before you can remove black mold, you need to find it. Stachybotrys has distinctive characteristics that differentiate it from other dark molds.
Visual and Texture Clues
Black mold is dark greenish-black, slimy when active and powdery when dry, and grows in patches on paper-faced drywall, ceiling tiles, or wood that has stayed wet for days. Dry growth releases spores when disturbed, so don't poke or wipe it before it's contained. For the full visual breakdown by surface, with photos and the common look-alikes, see what black mold looks like.
Where Black Mold Hides
Black mold needs chronic moisture. Check these areas first:
- Behind walls near past water leaks or plumbing
- Under sinks where slow drips go unnoticed
- Around windows with persistent condensation
- In basements and crawl spaces with poor drainage
- In attics with roof leaks or poor ventilation
- Behind wallpaper that traps moisture
- In HVAC ducts with condensation buildup

Should You Test Before Removing?
The EPA's position: if you can see mold, you don't need to test before removing it — just remove it. Testing matters most when:
- You can smell mold but can't find it
- You want to confirm Stachybotrys specifically (for insurance claims or health documentation)
- You need post-remediation clearance to confirm the job was done properly
- You're buying a home and suspect hidden mold
A professional mold assessment costs $300-$700 on average and includes air sampling, surface sampling, and a detailed report.
Bathroom condensation: the most common black-mold pattern
If your black mold is forming in a vertical stripe pattern below a bathroom window, you don't have a leak — you have a condensation problem. Single-pane windows, missing or jammed trickle vents, exhaust fans that vent into the attic instead of through the roof, and inadequate insulation around window frames all create cold surfaces where humid bathroom air condenses, runs down the wall, and feeds chronic mold growth.
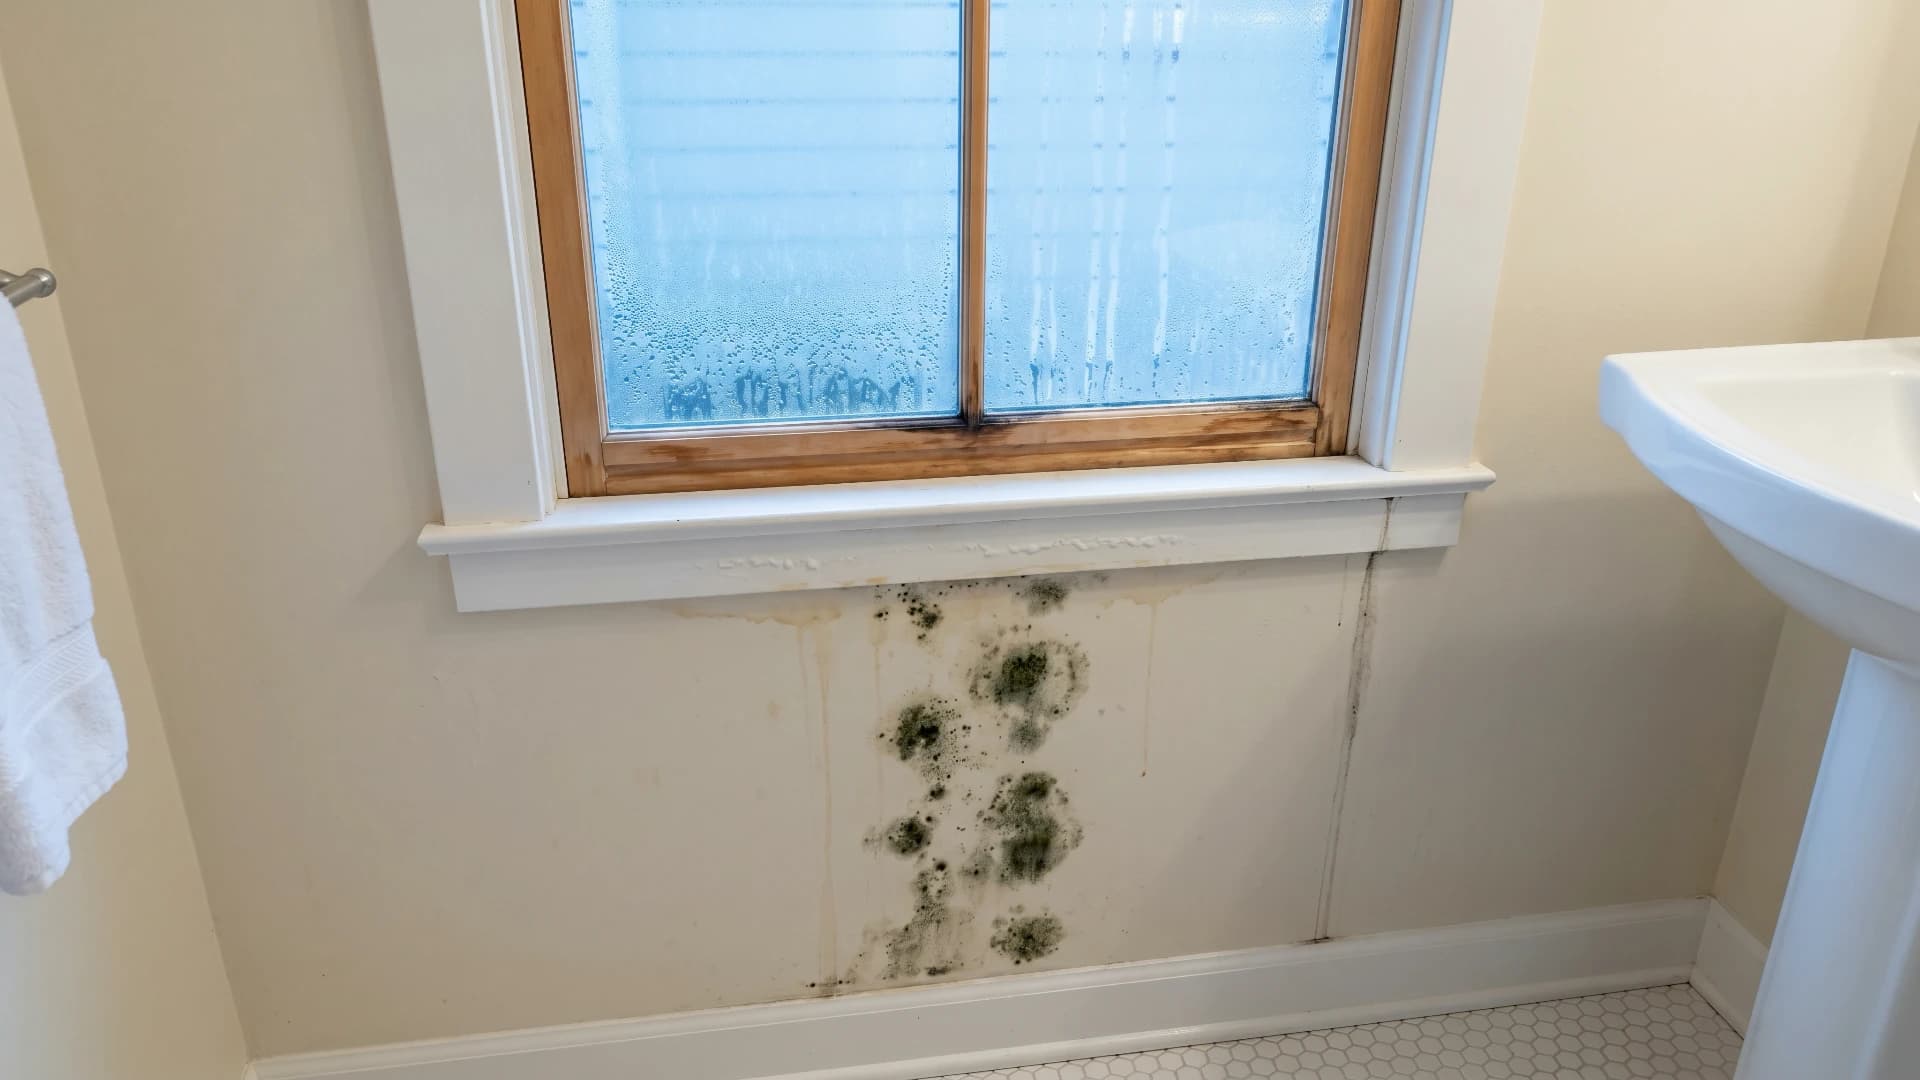
The fix is rarely a cleaner. It's ventilation: run your bathroom exhaust fan during AND for 30 minutes after every shower, keep trickle vents fully open even in winter, and run a dehumidifier in damp months. If a single-pane window is the cold surface causing the condensation, double-pane replacement is the long-term fix.
Does Bleach Actually Kill Mold?
Short answer: on hard non-porous surfaces, yes — but it's the wrong tool for porous materials like drywall, wood, or grout.
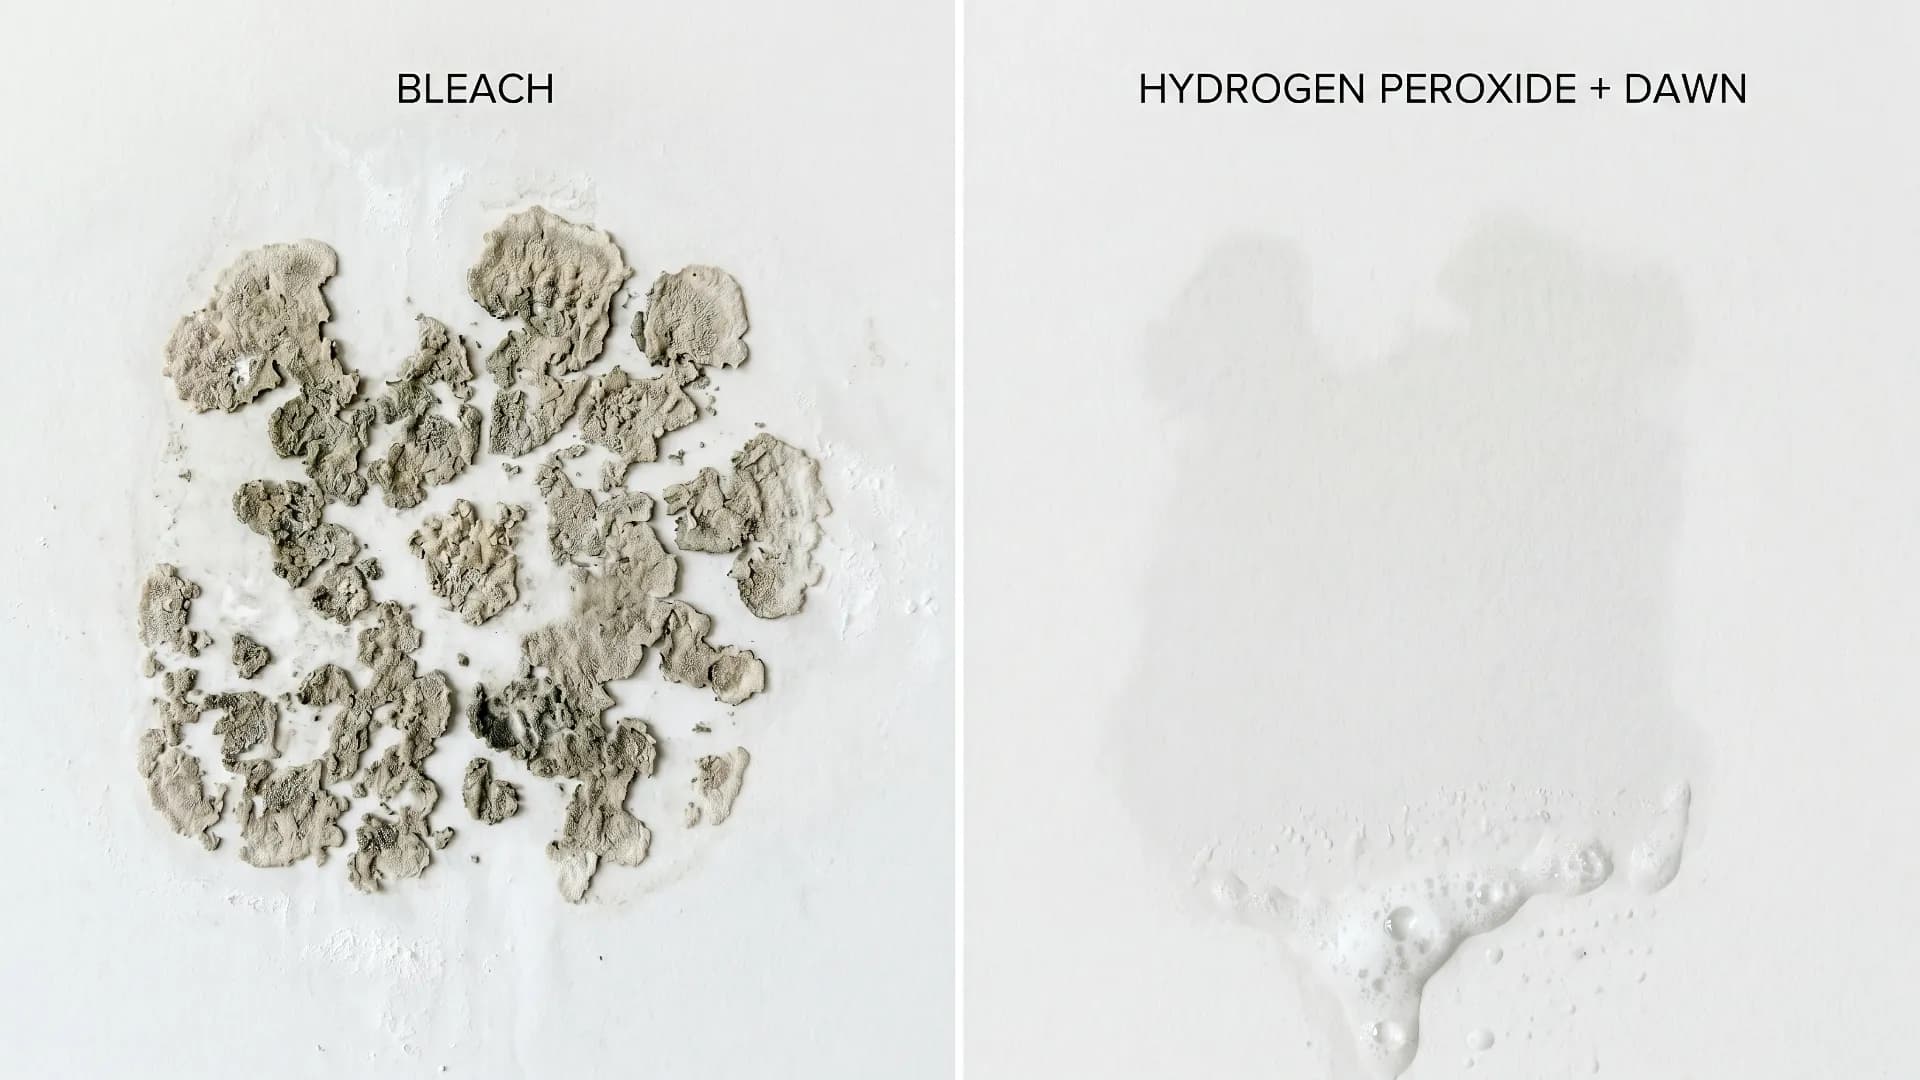
The IICRC S520 standard — the published professional standard for mold remediation — explicitly says bleach doesn't penetrate porous surfaces. The chlorine evaporates and only the water remains, which can feed mold roots beneath the surface. This is why bleach-treated drywall mold comes back darker within weeks: the visible spots faded (bleach is a bleaching agent — it removes color), but the mold itself is still alive and now feeding on the residual water.
What actually works:
- Hydrogen peroxide (3%) + Dawn dish soap, 3:1 ratio — the surfactant lifts the mold off the surface so the peroxide can contact the cells. Consistent with IICRC S520 guidance on non-porous surface treatment, though the specific 3:1 ratio is a practitioner-tested formulation, not a published S520 prescription.
- Undiluted white vinegar — kills many common mold species on contact. Works on tile, glass, and sealed concrete; less effective on porous surfaces.
- EPA-registered antimicrobial agents — professional-grade, used by certified remediators on substrates that survive remediation.
What doesn't work on porous materials:
- Bleach on drywall, wood, or grout — per IICRC S520, chlorine evaporates without penetrating; only water remains.
- Eucalyptus, tea tree, or clove oil — folk remedies with no IICRC backing. They smell like solutions but won't penetrate active colonies.
- Stain-blocking primer (Kilz, Zinsser) — paints over the mold; the mold continues growing underneath until it pushes through the paint.
Never mix bleach with vinegar or ammonia. The combination produces chlorine gas. Choose one product. For more on vinegar's specific use cases and limitations, see our Cleaning Mold With Vinegar Guide.
Can You Remove Black Mold Yourself?
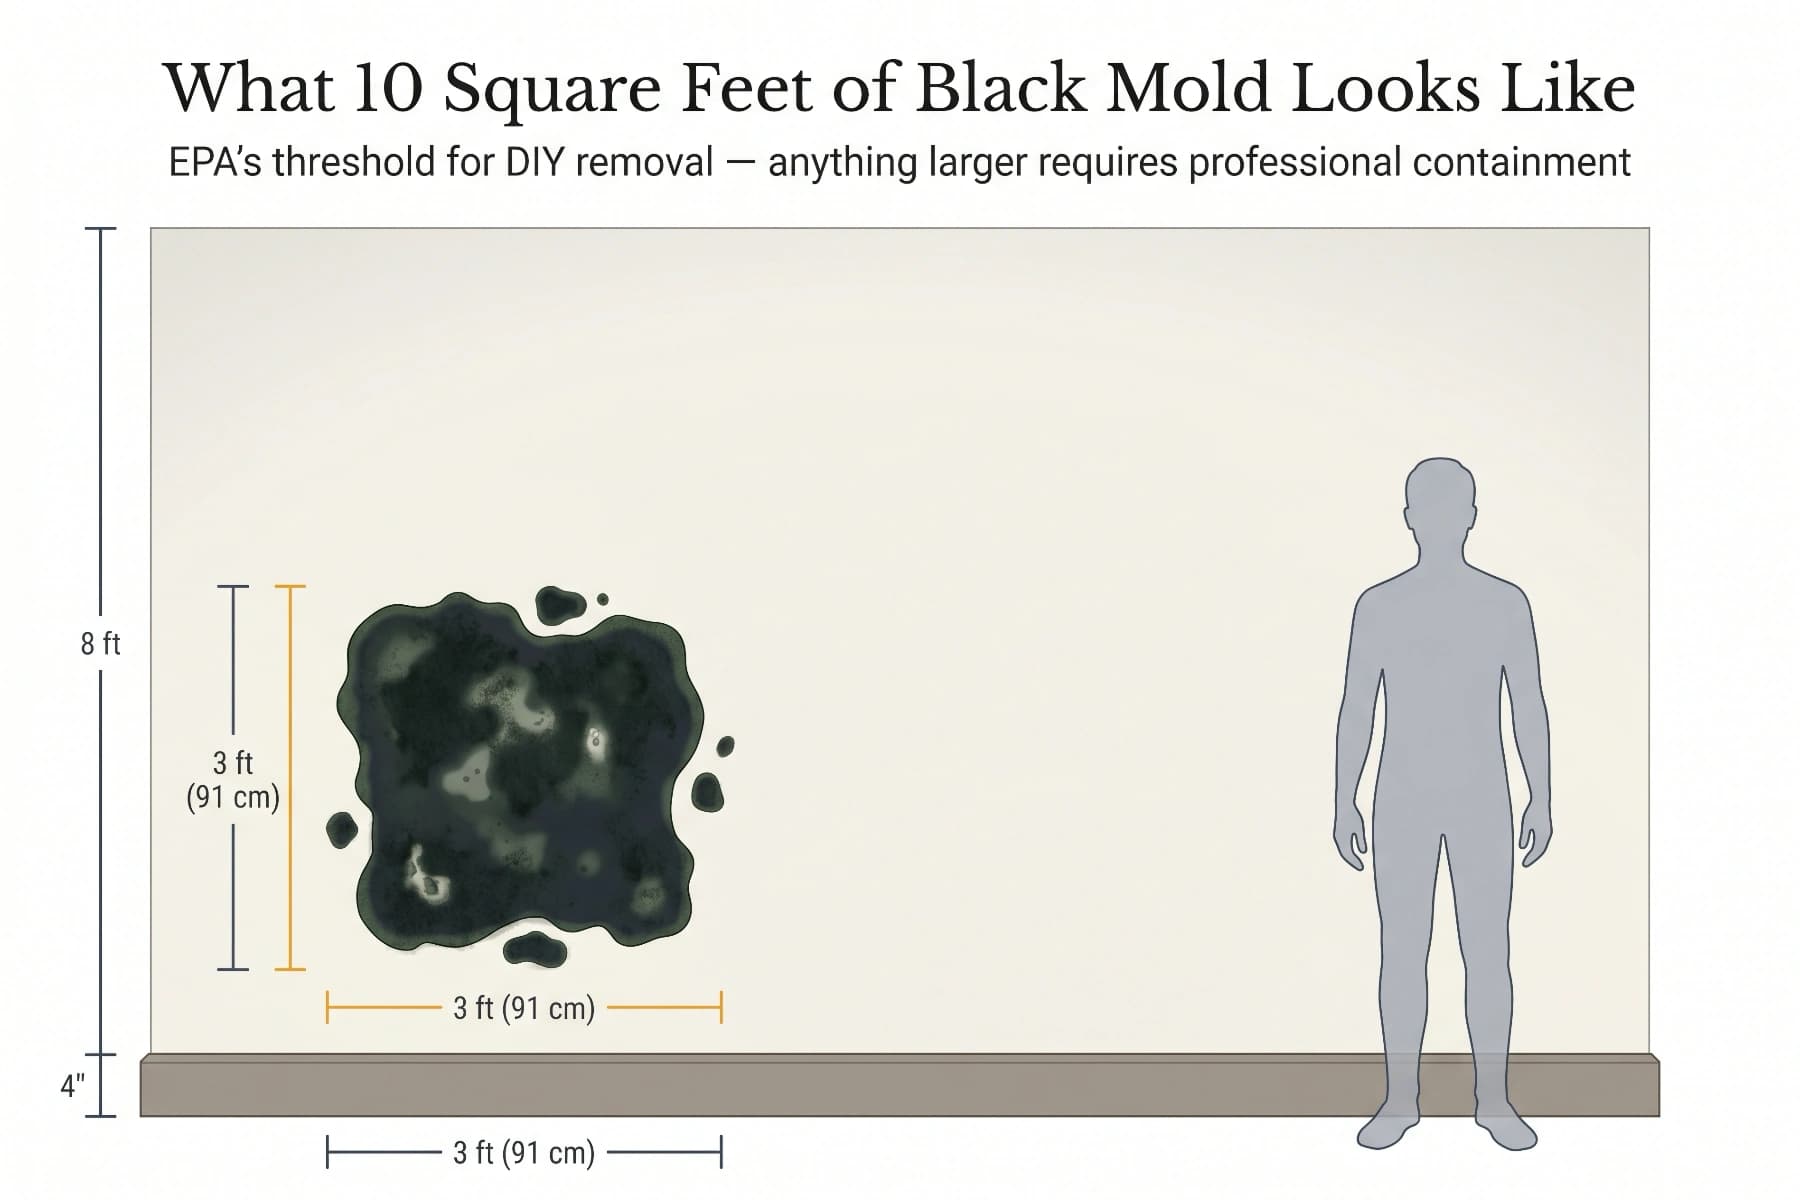
This decision comes down to the EPA's 10 square foot rule and what material the mold is growing on.
DIY Is Appropriate When:
- Mold covers less than 10 square feet (roughly a 3×3 ft patch)
- Mold is on hard, non-porous surfaces (tile, sealed concrete, glass, metal)
- There is no water damage to drywall or structural materials
- Nobody in the household has respiratory conditions or immune issues
- You can wear proper PPE (N95 respirator, goggles, gloves)
Call a Professional When:
- Mold covers more than 10 square feet
- Mold is on drywall, wood, carpet, or insulation
- Mold is in the HVAC system
- Mold resulted from sewage backup or contaminated water
- Mold keeps coming back after DIY cleaning
- Anyone has health symptoms related to exposure
- You need insurance documentation or post-remediation testing
The critical distinction: Surface mold on tile is a cleaning problem. Mold on drywall is a demolition and containment problem. Drywall cannot be "cleaned" of mold — the paper facing is food for mold, and roots penetrate the gypsum core. Contaminated drywall must be cut out and replaced.
For a deeper dive on the DIY decision, see our DIY vs Professional Mold Removal Guide.
How to Safely Remove Small Black Mold Areas (Under 10 sq ft)
If your black mold meets the DIY criteria above, follow these EPA-recommended steps. Safety is non-negotiable — even small amounts of Stachybotrys release harmful spores when disturbed.
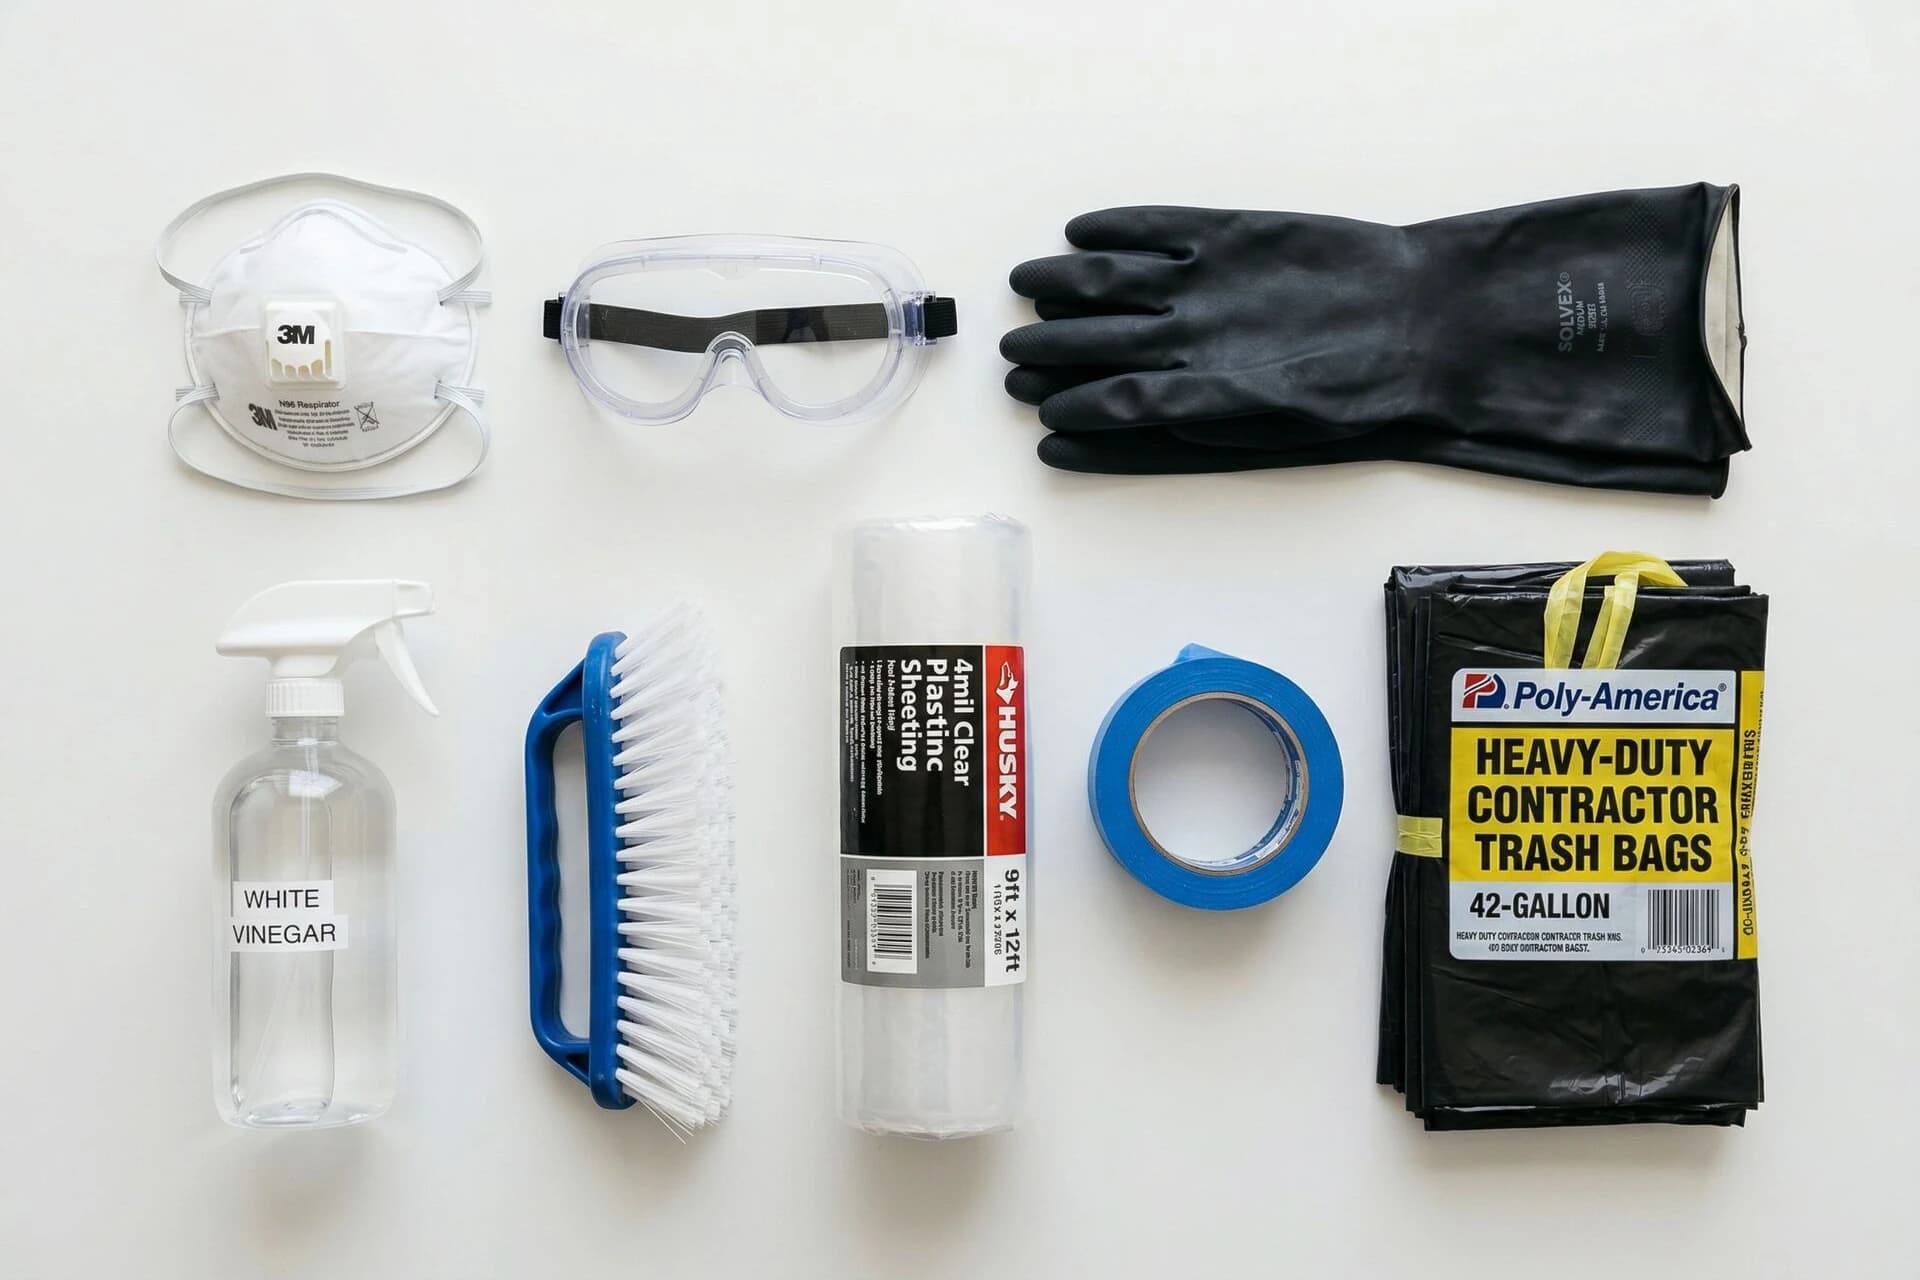
What You'll Need
| Item | Why |
|---|---|
| N95 respirator | Filters mold spores (surgical masks are NOT sufficient) |
| Non-vented goggles | Prevents spores from reaching eyes |
| Rubber gloves (forearm length) | Skin contact protection |
| Plastic sheeting + tape | Seals room to prevent spore spread |
| Spray bottle with water | Misting suppresses airborne spores |
| 3% hydrogen peroxide + Dawn dish soap (3:1) | Primary cleaner. Surfactant lifts mold off the surface so peroxide can contact cells |
| White vinegar (undiluted) | Backup cleaner — kills many common mold species on hard surfaces |
| Stiff scrub brush | Physical removal from hard surfaces |
| Heavy-duty trash bags | Safe disposal of contaminated materials |
| Fan pointed out window | Ventilation during cleaning |
Step-by-Step Process
Step 1: Seal the room. Close all doors. Cover HVAC vents and any openings with plastic sheeting and painter's tape. This prevents spores from traveling to other rooms.
Step 2: Gear up. Put on your N95 respirator, goggles, and gloves before touching anything. This is not optional — even brief exposure to concentrated spores can trigger reactions.
Step 3: Mist before disturbing. Lightly spray the moldy area with water from a spray bottle. Wet mold releases far fewer airborne spores than dry mold. Never dry-scrub mold.
Step 4: Apply the cleaner. Mix 3 parts 3% hydrogen peroxide with 1 part Dawn dish soap (or any plain liquid dish soap — UK readers, Fairy liquid is the equivalent) in a spray bottle. Spray directly onto the mold and let it sit for 10 minutes. The dish soap is critical: it's a surfactant that breaks the mold's surface tension so the peroxide can actually reach the cells. Without the soap, the peroxide beads up and doesn't penetrate.
Alternatives: undiluted white vinegar with a 60-minute dwell time also works; on the tile face itself, glass, and sealed concrete (not grout lines, which are porous), a bleach solution (1 cup per gallon) is acceptable. Never use bleach on porous materials — see the bleach section above for why.
Never mix bleach with vinegar or ammonia. This creates toxic chlorine gas. Choose one product and stick with it. For more on vinegar's effectiveness and limitations, see our Cleaning Mold With Vinegar Guide.
Step 5: Scrub and rinse. After the contact time, scrub with a stiff brush and rinse with clean water. Wipe the area with a clean, damp cloth to remove residue.
Step 6: Bag everything. All rags, gloves, brushes, and plastic sheeting go into heavy-duty trash bags. Seal the bags inside the room before carrying them out.
Step 7: Dry completely. Use fans and/or a dehumidifier to dry the area thoroughly. Mold cannot grow without moisture.
Step 8: Fix the moisture source. This is the most important step. Repair the leak. Fix the ventilation. Run a dehumidifier. If you skip this, the mold will return — guaranteed.
Don't paint or caulk over moldy surfaces. Per EPA guidance, paint applied over moldy surfaces is likely to peel — and the mold keeps growing underneath until it pushes through. Stain-blocking primers seal the visible stain but don't kill the mold. Always clean, dry, and remediate before painting.
If the mold keeps coming back after cleaning, it's behind the wall. Surface cleaning only addresses the visible portion of an active colony — the roots are inside the drywall, the moisture is inside the cavity, and both will keep feeding new growth until the wall is opened up. Recurring black mold on a single patch within 3-4 weeks of cleaning is the signal to stop spraying and call a remediator.
When to Call a Professional
Professional remediation is necessary when the job exceeds what safe DIY practices can handle. Here are the clear signals:
Size
Any mold area over 10 square feet requires professional containment. Without negative air pressure and HEPA filtration, disturbing large mold colonies spreads millions of spores throughout your home.
Material
Mold on porous materials — drywall, carpet, ceiling tiles, insulation, or unfinished wood — cannot be cleaned. These materials must be removed under containment. A professional will:
- Set up containment barriers (poly sheeting, negative air)
- Cut out contaminated materials (typically 2 ft beyond visible mold)
- HEPA vacuum all surfaces
- Apply antimicrobial treatment
- Verify with post-remediation testing
Location
Mold in HVAC systems, inside wall cavities, or in crawl spaces requires specialized equipment and training. HVAC mold is particularly dangerous because the system distributes spores to every room.
Health Concerns
If anyone in the household is experiencing mold exposure symptoms — persistent coughing, headaches, or respiratory issues — don't attempt DIY removal. Professional remediation with proper containment minimizes continued exposure.
Choosing the Right Professional
Not all mold companies are equal. Look for:
- State licensing — Required in most states for mold remediation
- IICRC certification — WRT (Water Restoration Technician) or AMRT (Applied Microbial Remediation Technician) are the gold standard
- Liability insurance — Specifically pollution liability, not just general liability
- Third-party testing — The remediator should NOT be the same company that does your mold testing (why separation matters)
- Written scope of work — Detailed protocol before work begins
For a comprehensive hiring checklist, see our How to Hire a Mold Professional Guide and Questions to Ask a Mold Company.
Renting? You can clean visible surface mold yourself, but the underlying moisture problem — the leak, the failing window seal, the bathroom with no exhaust fan — is your landlord's responsibility under most state habitability laws. Document everything with dated photos. Send your landlord a written request to address it (email works; keep the thread). If they refuse, your state housing authority is your next step. Surface cleaning without fixing the moisture is a temporary patch — the mold will come back within weeks. For EPA-published guidance, see the EPA mold resources.
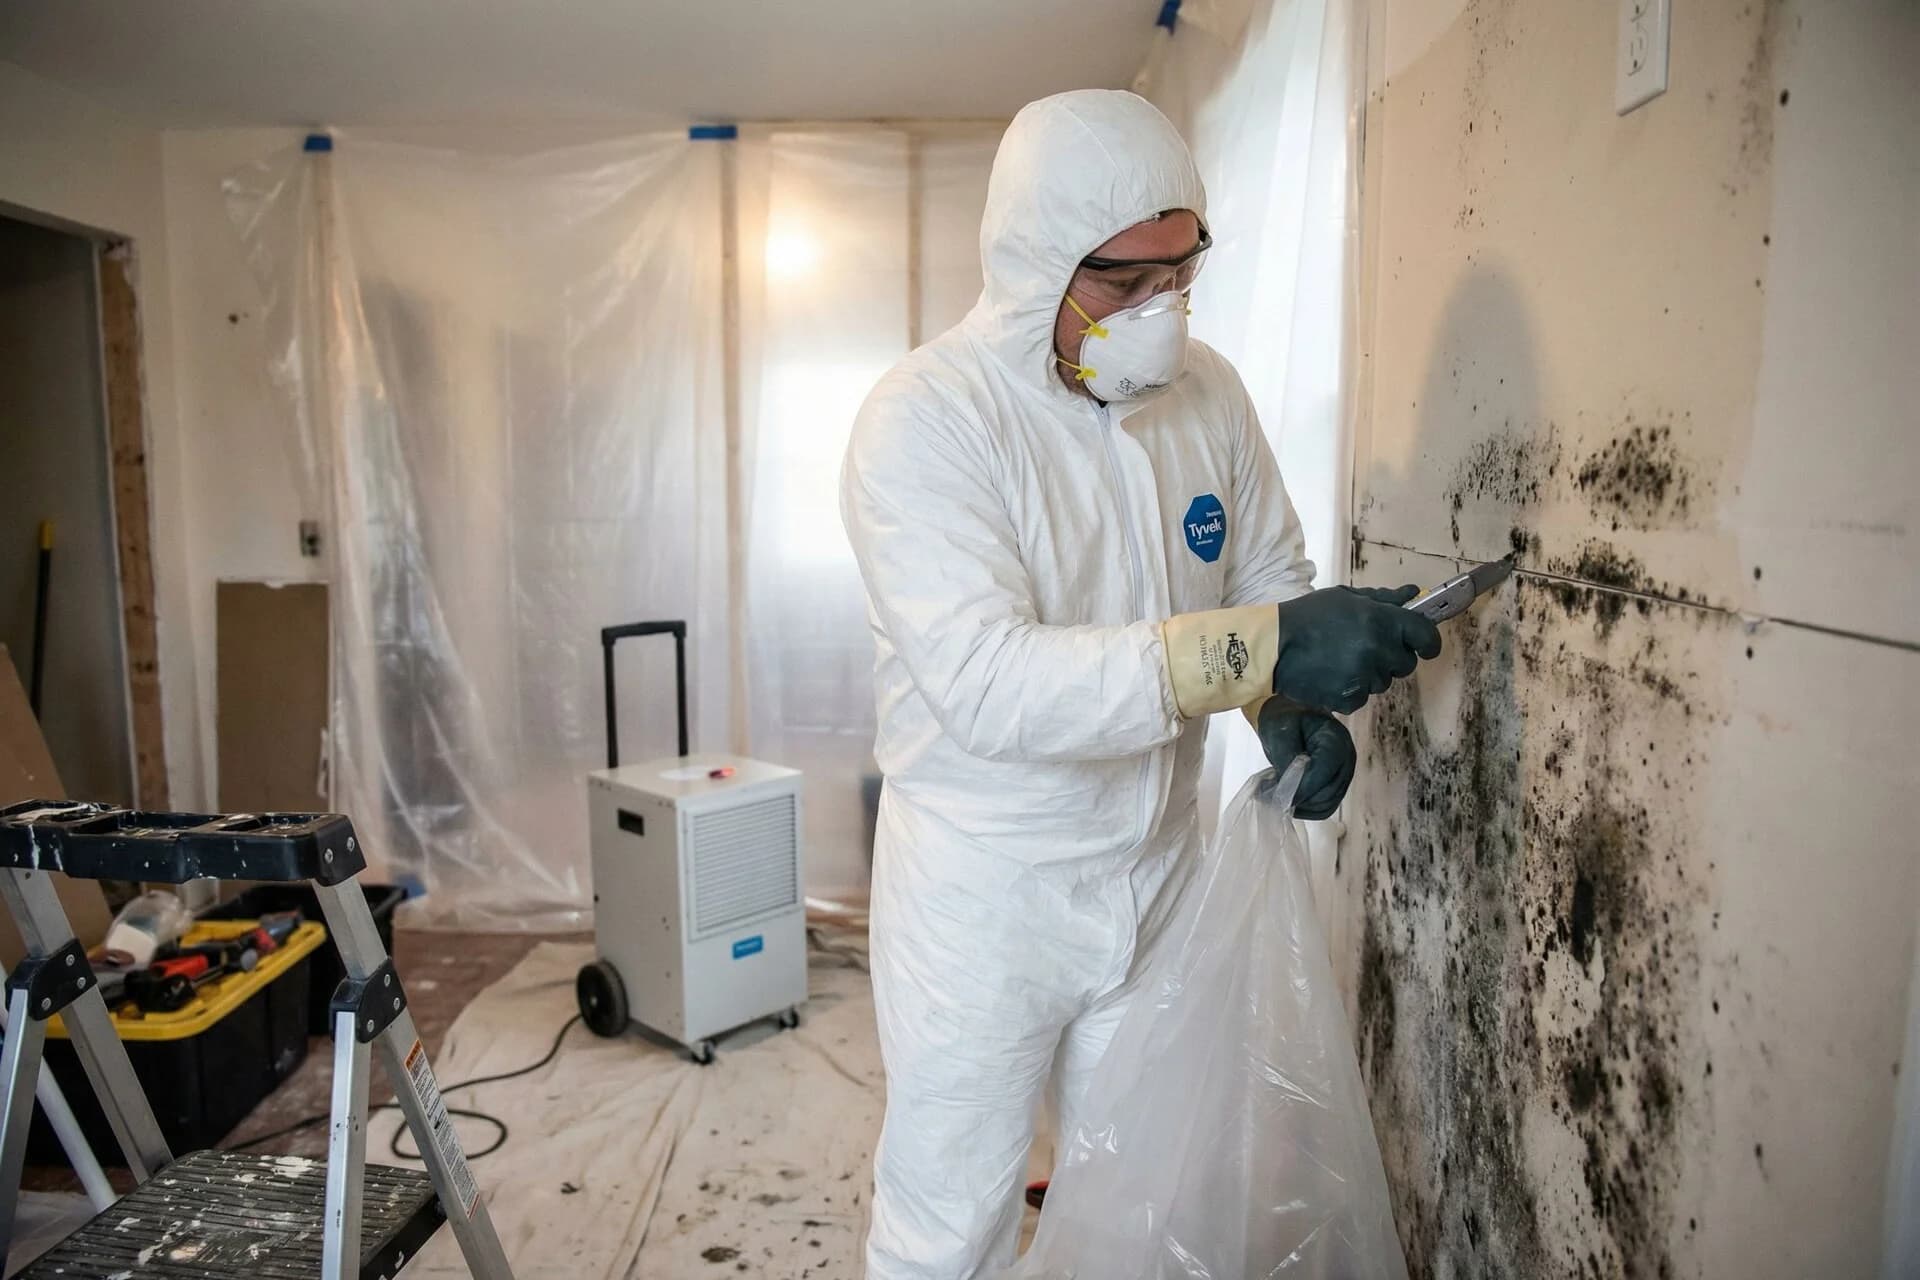
What Professional Black Mold Remediation Looks Like
If you hire a certified remediator, here's what the process typically involves:
1. Assessment and Protocol
A licensed mold assessor (separate from the remediator) tests the mold, identifies the extent, and writes a remediation protocol — a detailed plan the remediator follows.
2. Containment Setup
The remediation team seals the affected area with poly sheeting and sets up negative air pressure using HEPA-filtered air scrubbers. This prevents spores from escaping the work area.
3. Removal
Contaminated materials are carefully removed. For drywall, this means cutting at least 2 feet beyond the visible mold line — mold roots extend further than what you can see. Materials are bagged, sealed, and removed through a designated exit path.
4. HEPA Vacuuming and Treatment
All remaining surfaces (studs, subfloor, concrete) are HEPA vacuumed to remove settled spores, then treated with an EPA-registered antimicrobial agent.
5. Clearance Testing
The mold assessor returns (not the remediator) to take post-remediation air and surface samples. Lab results must show spore counts at or below outdoor ambient levels before the area is cleared for reconstruction.
6. Reconstruction
Removed drywall, insulation, and other materials are replaced. This is typically handled by a general contractor, not the remediation company.
Timeline: 1-5 days for remediation, plus 1-2 days for clearance testing results.
Black Mold Removal Costs
Professional black mold removal pricing depends primarily on the size of the affected area and the materials involved.
| Project Size | Area | Typical Cost | Includes |
|---|---|---|---|
| Small | Under 50 sq ft | $1,500-$3,000 | Containment, removal, HEPA cleaning |
| Medium | 50-200 sq ft | $3,000-$6,000 | Full containment, material removal, treatment |
| Large | 200-500 sq ft | $6,000-$10,000 | Multi-room containment, extensive demolition |
| Severe | 500+ sq ft / HVAC | $10,000-$25,000+ | Whole-home remediation, duct cleaning |
What Drives the Cost Up
- Drywall and insulation removal — adds $1,000-$3,000 in demolition and replacement
- HVAC cleaning — adds $2,000-$5,000 for duct remediation
- Crawl space access — adds $500-$2,000 for difficult access
- Structural damage — joists, studs, or subfloor replacement adds $2,000-$8,000
- Post-remediation testing — $300-$700 for clearance testing (often required)
Cost-Saving Tips
- Get 3 quotes — pricing varies significantly between companies
- Ask about scope — make sure quotes cover the same work
- Fix the water first — if the moisture source isn't fixed, you'll pay for remediation twice
- Don't combine testing and removal — companies that do both have a financial conflict of interest
- Check insurance — file a claim if mold resulted from a covered water event
For a complete cost breakdown by location, mold type, and project size, see our Mold Remediation Cost Guide.
Preventing Black Mold
Black mold needs three things: moisture, organic material, and time. Remove any one of those and it can't grow.
Moisture Control (Most Important)
- Fix leaks immediately — small, persistent drips create the sustained moisture black mold needs to take hold
- Keep indoor humidity below 50% — use a hygrometer ($10-$20) to monitor. Run a dehumidifier in damp areas
- Ventilate bathrooms and kitchens — run exhaust fans during and 30 minutes after showers and cooking
- Don't ignore condensation — condensation on windows, pipes, or walls signals excess humidity
After Water Events
- Act within 24-48 hours — mold begins growing on wet materials within 48 hours
- Extract standing water — wet/dry vacuums, pumps, or professional extraction
- Remove wet materials — drywall, carpet padding, and insulation that can't be dried within 48 hours should be removed
- Run dehumidifiers and fans — continuous air movement and dehumidification for 3-5 days minimum
Ongoing Prevention
- Inspect regularly — check under sinks, around water heaters, and in basements monthly
- Clean gutters — clogged gutters cause water intrusion along foundation walls
- Grade soil away from foundation — prevents water pooling against your home
- Maintain HVAC — change filters regularly, ensure drain pans are clear
Frequently Asked Questions
Frequently Asked Questions
How much does professional black mold removal cost?
Can I remove black mold myself?
Is all black-colored mold dangerous?
What kills black mold permanently?
How long does professional black mold remediation take?
Does homeowners insurance cover black mold removal?
What are the health risks of black mold exposure?
How do I know if I have black mold vs regular mold?
Should I leave my house during black mold removal?
Can black mold grow back after remediation?
Recap: How to Get Rid of Black Mold
To get rid of black mold safely, follow this order:
- Find the moisture source first. Cleaning mold without fixing the water makes you pay to do the job twice. Look for leaks, condensation patterns, failing ventilation, and chronic damp.
- Apply the EPA's 10 square foot rule. Under 10 sq ft on hard non-porous surfaces (tile, glass, sealed concrete) is DIY-eligible. Drywall, wood, carpet, insulation, HVAC, or anything larger requires a certified remediator.
- For DIY-eligible patches, use 3 parts 3% hydrogen peroxide to 1 part Dawn dish soap. The surfactant lifts the mold off the surface so the peroxide can contact the cells. Wear an N95 respirator, non-vented goggles, and forearm-length gloves. Never use bleach on porous surfaces — it decolorizes mold without killing the roots.
- For pro-sized jobs, hire an IICRC-certified remediator with pollution liability insurance. The remediator should NOT be the same company that did your mold testing — keep assessment and remediation separate to avoid a built-in conflict of interest.
- After remediation, verify with post-clearance testing. Spore counts should be at or below outdoor ambient levels before reconstruction begins.
The most expensive mistake is ignoring the moisture source. Whether you DIY the cleaning or hire a pro, the moisture fix is what makes the work stick.
For anything past the EPA's 10-square-foot threshold, you can find a professional mold remediation company and compare certified remediators near you.